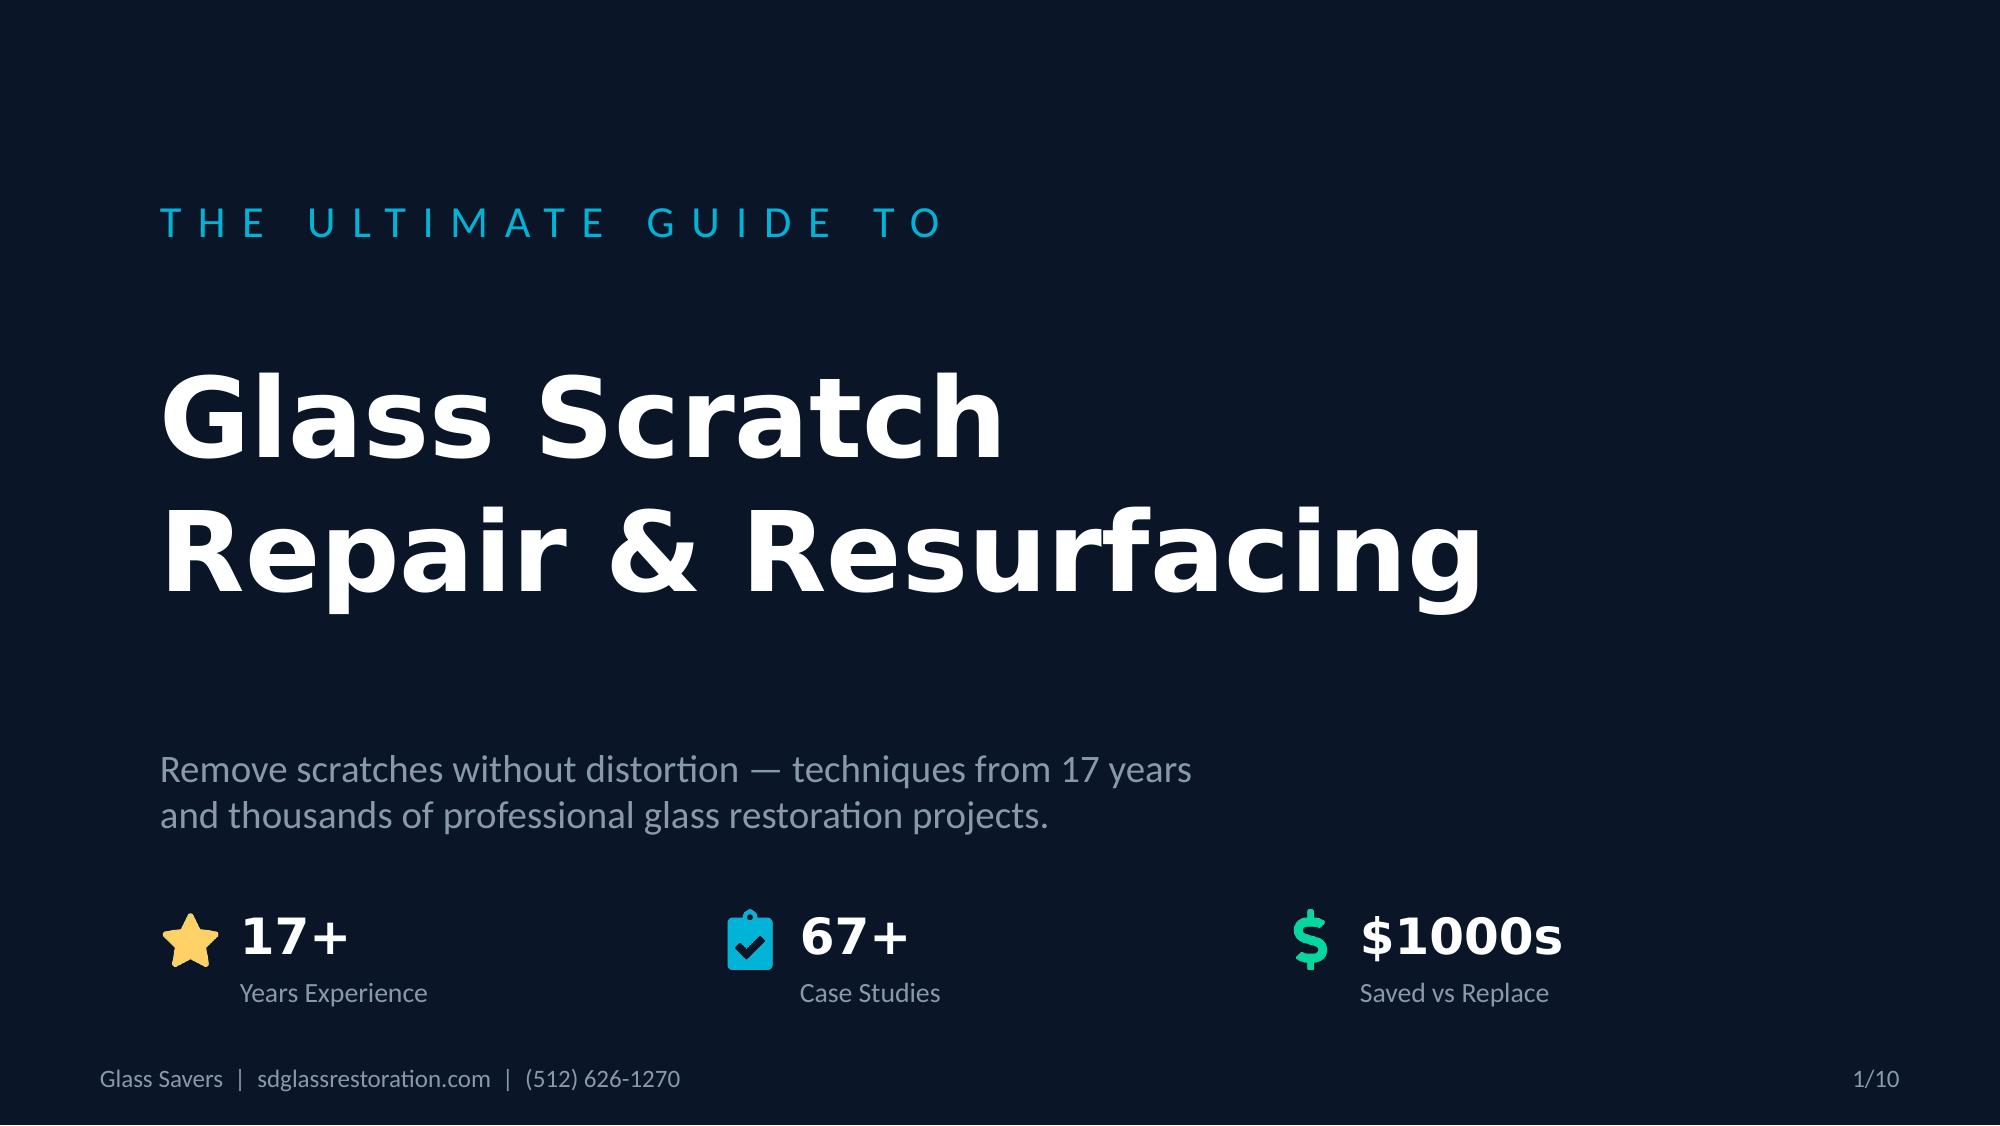
The Ultimate Guide to Professional Glass Scratch Repair & Resurfacing
Everything you need to remove scratches from glass without distortion -- the same techniques we've used on thousands of projects over 17 years. Written for technicians, business owners, and anyone who wants to do this right.
Glass scratch repair is a professional resurfacing process that removes scratches by grinding the damaged area with progressively finer abrasives and polishing with cerium oxide to restore optical clarity. This guide covers the complete glass scratch removal process, from assessment and equipment selection through advanced feathering techniques, based on 17 years of field experience across thousands of projects.
* Minimum charge applies: $500 for local jobs in Austin and San Diego; $5,000 for out-of-town projects. Widespread damage priced at $30–$35/sq ft of full panel dimensions.
Prices are ballpark averages — every situation is unique. Contact us for an exact quote.
What Glass Resurfacing Actually Is (and Why It Beats Replacement)
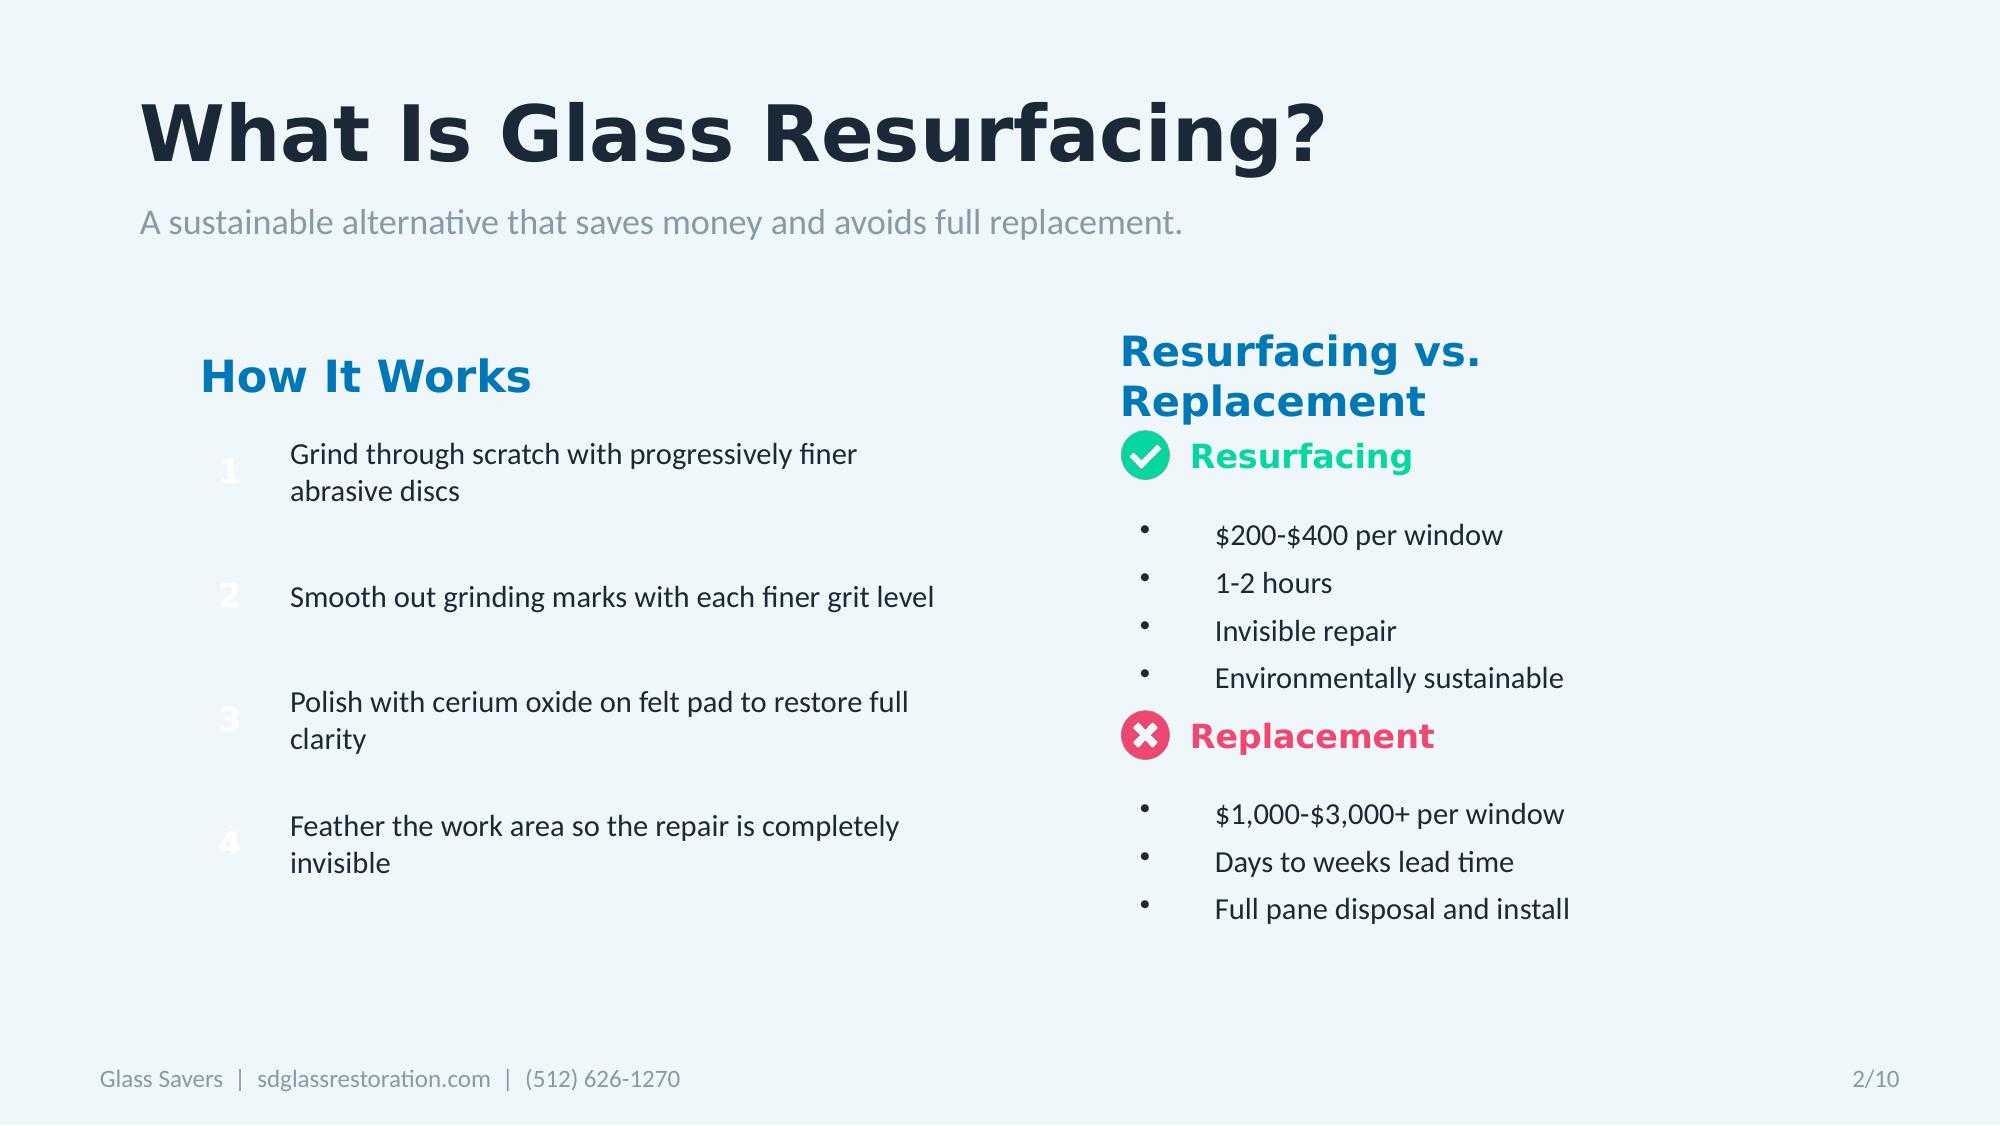
Scratched glass looks bad, kills visibility, and tanks property value. The old-school fix was to rip it out and replace it. That's expensive, slow, and usually unnecessary.
Glass resurfacing removes scratches by grinding away a microscopic layer of glass with abrasive discs, then polishing back to full clarity with cerium oxide. When it's done right, the repair is invisible. No haze. No distortion. No trace of the original damage. This is a sustainable solution that avoids the environmental cost of full glass replacement.
This isn't theoretical. We've used this process on storefront graffiti, construction debris damage, welding slag burns, pet scratches on sliding doors (raccoons too), and acid-etched vandalism across the country. The tools are straightforward. The technique is what separates good results from bad ones.
Glass resurfacing technology has advanced significantly, offering professional-grade results. Modern techniques with silicon carbide abrasives and cerium oxide polishing can eliminate even deep scratches, saving clients money while maintaining structural integrity. Top glass restoration companies have proven that almost any scratch can be removed given the right tools and skills -- even damage once thought "impossible" without replacement. This guide demystifies those techniques, empowering you to achieve distortion-free, like-new glass surfaces.
How It Works (30-Second Version)
You grind through the scratch with progressively finer abrasive discs -- starting coarse enough to erase the damage, stepping finer to smooth out your own grinding marks. Then you polish with cerium oxide on a felt pad to restore full transparency. The trick is feathering: working a large enough area around the scratch that the eye can't detect where the repair happened. By evenly abrading the glass around the scratch and feathering out the repair area, you avoid creating visible low spots or "lens" distortions. When done correctly, the repaired area will be virtually invisible and as strong as the original pane.
Why This Is Worth Learning
A storefront scratch removal might cost $225–400 and take an hour or two. Replacing that same window? $1,000–3,000+ with days or weeks of lead time. For commercial properties with multiple damaged windows, resurfacing saves tens of thousands. See the full breakdown at glass scratch repair vs. replacement. That's a compelling pitch whether you're offering scratch removal services or just trying to save your own building some money. Not sure if your glass qualifies? Read can I remove scratches from glass? to find out.
Mastering these techniques allows you to match the quality of top firms with off-the-shelf tools and materials. You can tackle storefront graffiti scratches, construction damage, scratched table tops, even windshield wiper marks. This guide walks you through everything from equipment setup to finishing touches, so new technicians and seasoned glaziers alike can achieve flawless, distortion-free results.
Professional Glass Scratch Repair Services
Need an expert instead of DIY? Glass Savers offers professional glass resurfacing services with a no-distortion guarantee -- from single windows to large-scale commercial projects. We also specialize in glass graffiti removal, hard water spot removal, and anti-graffiti film installation. Get a free quote →
How to Remove Scratches From Glass (Professional Method)
Glass resurfacing removes scratches by grinding the damaged area with progressively finer abrasives and polishing with cerium oxide until the surface returns to optical clarity.
- Identify the depth of the scratch using the fingernail test.
- Select the starting abrasive grit based on scratch depth.
- Grind the scratch evenly with controlled pressure at 1000–1800 RPM.
- Feather the surrounding area to prevent optical distortion.
- Progress through finer abrasives (180→360→500→1000).
- Polish with cerium oxide on a felt pad to restore full clarity.
Table of Contents
- Introduction -- What Glass Resurfacing Is
- Glass Scratch Diagnosis Guide
- Equipment and Materials
- Step-by-Step Scratch Removal Process
- Advanced Techniques and Best Practices
- High-Volume Workflow Optimization
- Safety Protocols and Regulatory Compliance
- Troubleshooting Common Issues
- Comparison with Top Industry Methods
- Professional Reference: Glass Resurfacing Standards
- Frequently Asked Questions
Glass Scratch Diagnosis Guide
- Deep scratches you can feel with a fingernail -- see case study
- Light scratches visible only in sunlight -- see case study
- Razor blade scratches -- see case study
- Post-construction scratches -- see case study
- Graffiti damage and acid-etch marks -- see case study
- Polishing distortion and how to avoid it -- see example
- Hard water stains mistaken for scratches -- see demo
Equipment & Materials You'll Need
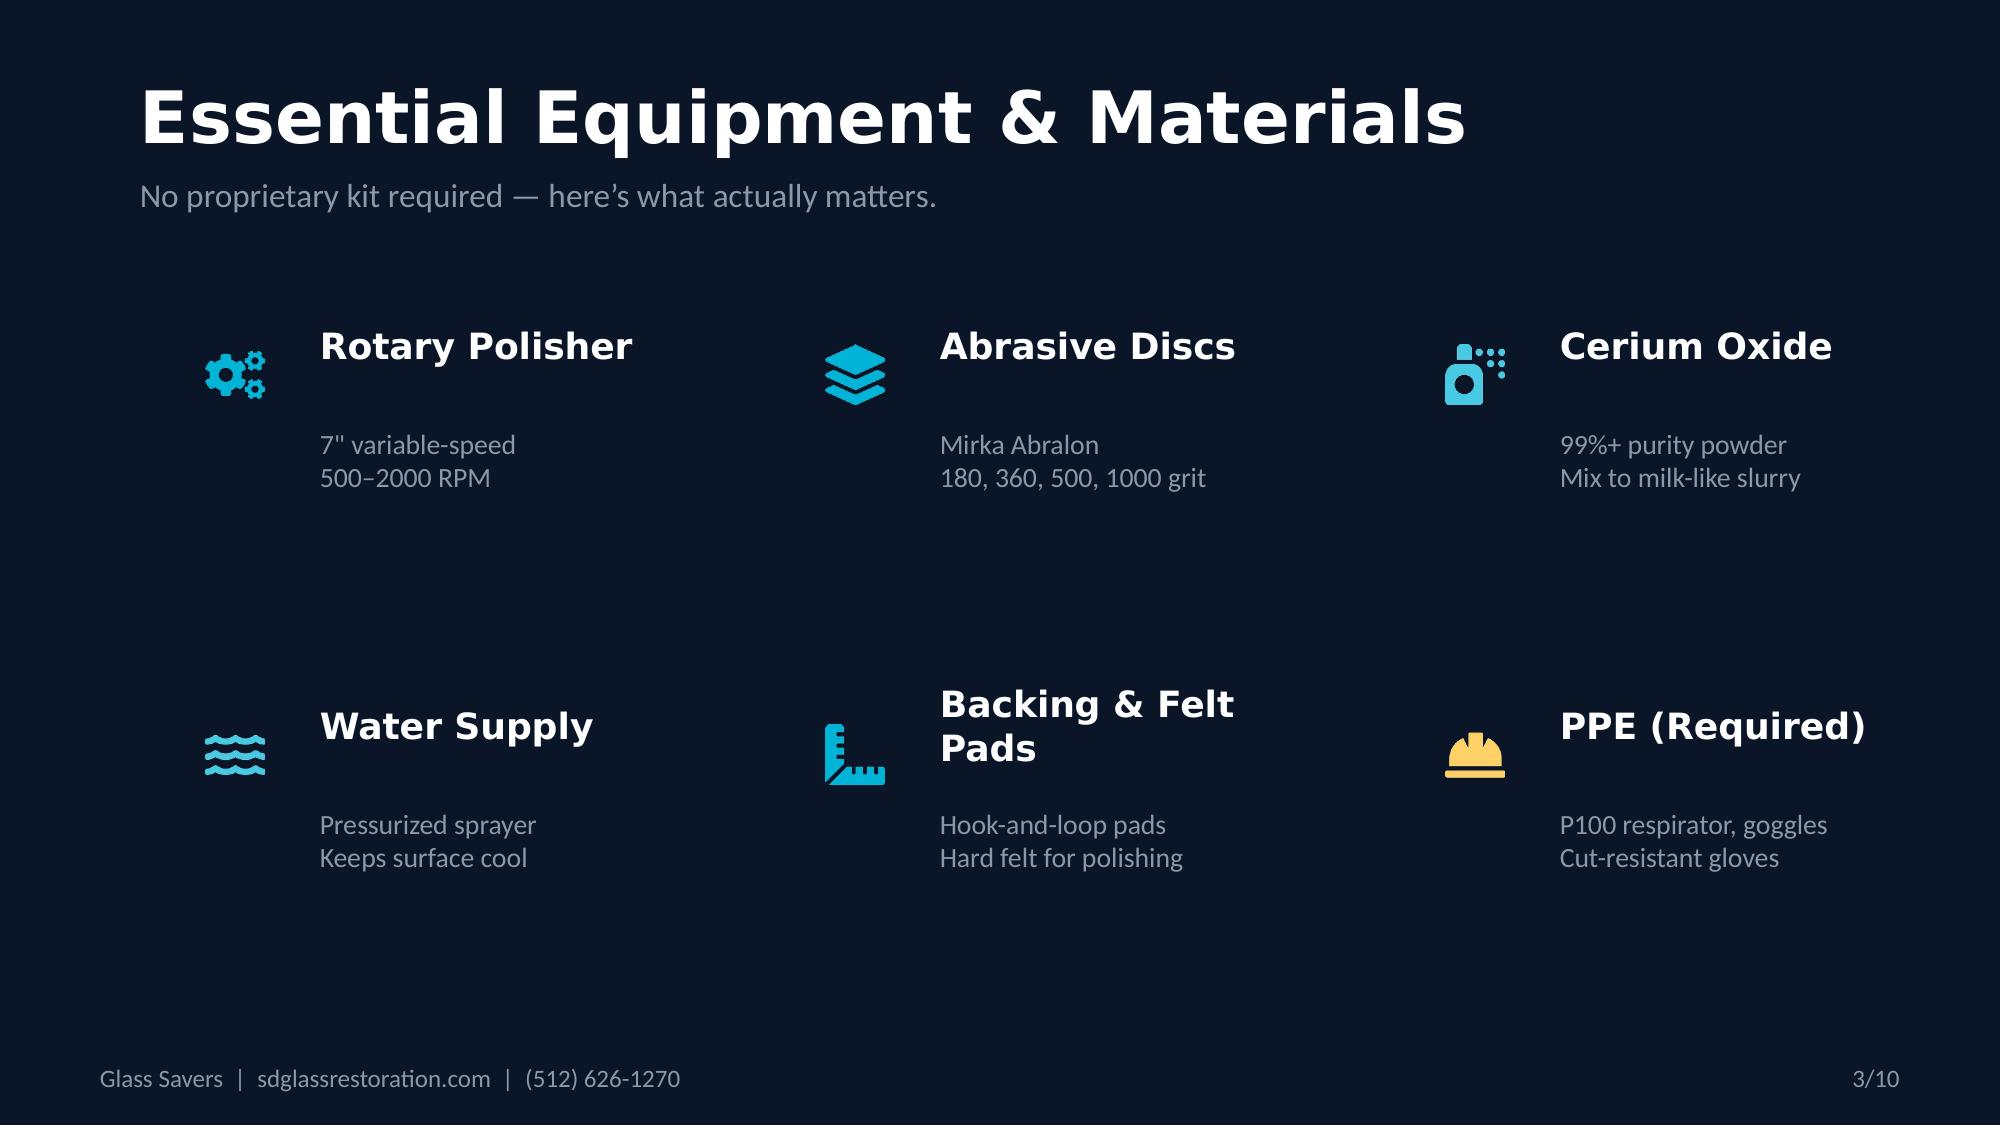
You don't need a proprietary kit or a $5,000 setup. Professional glass resurfacing systems include specialized grinding and polishing tools. Here's what actually matters.
| Item | What to Get | Why It Matters |
|---|---|---|
| Rotary Polisher | 7" variable-speed like Makita 9227C. 500–2000 RPM. | Random orbitals won't work -- you need true rotary for even, swirl-free grinding. Avoid DA sanders for scratch removal. |
| Abrasive Discs | Mirka Abralon foam-backed: 180, 360, 500, 1000 grit. Keep 80-grit SiC for extreme cases. | Mirka Abralons last longer, cut consistently, hook-and-loop for fast grit changes. Stock coarse (60, 80), medium (120, 180), fine (220, 320), and ultra-fine (600, 800, 1000+). |
| Backing Pads | Hook-and-loop pad sized to discs (e.g. 5" or 6"). Rated for tool RPM. | Swap grits in seconds. Use softer foam interface for polishing stages. Ensure spindle compatibility (common: 5/8"-11 thread in the US). |
| Felt Pads | Hard felt, 1/8–1/4" thick. 3" for spots, 5" for larger areas. | Thin, firm pads distribute pressure evenly and reduce chance of optical swirls. Never cross-contaminate with abrasive grit. Have spares dedicated to cerium use only. |
| Cerium Oxide | 99%+ purity powder (optical grade). Mix with water to milk-like slurry. | Low-purity = haze and slow polish. Good cerium polishes fast and clear. Reusable -- let slurry settle, decant, and reuse powder. |
| Water Spray | Hand pump minimum. Pressurized sprayer for big jobs. | Keeps surface cool and lubricated. Dry polishing = haze and cracked glass. Never let the glass go dry during polishing. |
| Marking & Tape | Wax pencil or china marker. Painter's tape. | Mark scratch on the opposite side -- you lose sight of it under slurry. Tape off frames, gaskets, and decals. |
| Cleaning | Glass cleaner, lint-free cloths, microfiber towels, clay bar. | Dirty glass = new scratches from trapped grit. Clean before and after. Clay bar removes stuck-on particles from scratch area. |
| PPE | Safety goggles or face shield. P100 respirator. Hearing protection. Cut-resistant gloves. | Non-negotiable. Glass dust is silica. Your lungs don't forgive that. Cover nearby items from slurry splatter with waterproof drop cloths. |
Nice to Have (Optional/Advanced Gear)
- Infrared Thermometer: Contact-free monitoring of glass temperature during grinding. Many pros ensure the glass stays below ~65°C (150°F). Top kits often include IR thermometers for this reason.
- HEPA Shop-Vac / Dust Extraction: If dry-grinding, use a HEPA shop-vac with a shroud attachment near the work area to capture dust. This helps keep your environment clean and compliant with silica dust regulations.
- Splash Guard: A clear plastic guard around the pad contains slurry spatter during polishing. You can DIY one from a plastic container or purchase from kit suppliers.
- Bright Work Light: A handheld light or work lamp placed at a low angle to the glass reveals remaining scratches or distortion. Many technicians use a flashlight from behind or above to inspect the polished area.
- Ladders/Scaffold: For high windows, ensure you have stable platforms so you can apply even pressure. Being comfortable and safe also improves quality of work.
With the right tools and materials ready, you can confidently approach the scratch removal process.
Which Grit Do I Start With?
Run your fingernail across the scratch. That tells you where to begin.
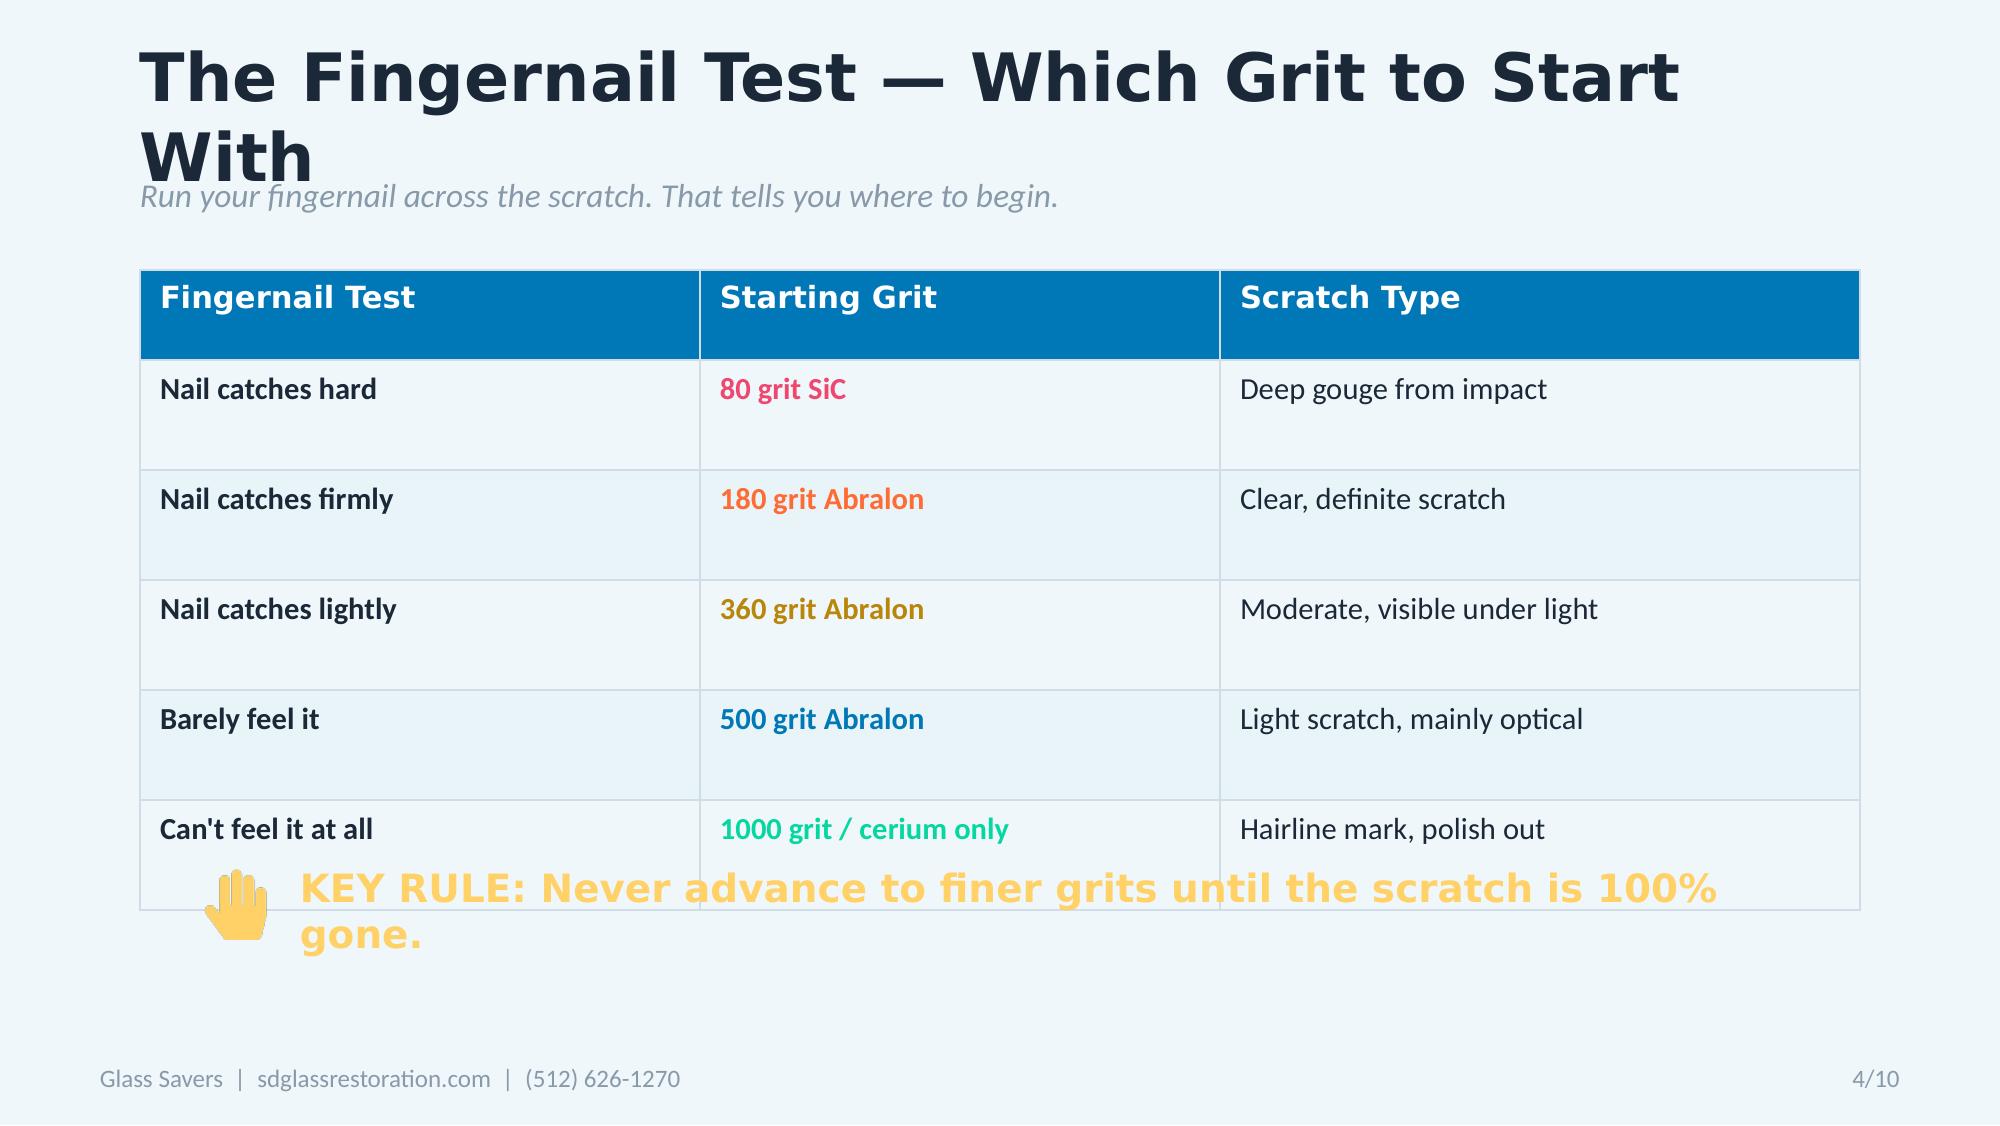
| Fingernail Test | Starting Grit | What You'll See |
|---|---|---|
| Nail catches hard, visible gouge | 80 grit silicon carbide (extreme only) | Deep groove from impact or diamond tool |
| Nail catches firmly | 180 grit Mirka Abralon | Clear, definite scratch you can feel |
| Nail catches lightly | 360 grit Mirka Abralon | Moderate scratch, visible under light |
| Barely feel it | 500 grit Mirka Abralon | Light scratch, mainly visible optically |
| Can't feel it at all | 1000 grit or cerium only | Hairline mark, may polish out without grinding |
Not sure how to assess scratch depth yourself? Our post on how to tell if glass scratches are repairable walks through the full assessment process.
Advanced Detail: Abrasive Disc Selection and Brands
Use high-quality silicon carbide discs labeled for glass/stone so they cut efficiently and last longer. Brands to consider: 3M Wetordry™ sandpaper discs or Mirka Abralon™. Discs often come in hook-and-loop (Velcro) or PSA (sticky-back) attachments -- choose based on your backing pad. Keep multiples of each grit on hand; for large projects (20–50 windows) you'll need spare abrasives as they wear.
A semi-flexible backing pad helps conform slightly to the glass. For the polishing stage, a softer interface pad or dedicated hook-and-loop backing may be needed to attach the felt. Ensure you can quickly swap between grits -- hook-and-loop systems make grit changes faster, which is helpful in high-volume workflows.
Advanced Detail: Cerium Oxide Grades and Sourcing
Use 99%+ pure cerium oxide for best results -- optical grade cerium costs more but cuts faster and leaves no haze. Reputable sources include C.R. Laurence, Universal Photonics, and other glass refinishing suppliers. Cerium often comes in different grades (regular or "optical fine"). For professional use, the investment in ultra-high purity is worthwhile to achieve a crystal-clear finish.
Cerium oxide is mildly abrasive (comparable to a fine polishing rouge) and is reusable -- you can let the slurry settle, decant and reuse the powder. Use distilled water for mixing slurry to avoid mineral contamination, especially in final polish.
Step-by-Step Scratch Removal Process
Follow these steps meticulously to achieve professional, high-clarity results. For training new employees, consider this a checklist to ensure consistency. Don't skip ahead. The most common mistake is rushing to polish before the scratch is fully ground out -- and then you're starting over.
Assessment -- Inspect and Test the Scratches
Clean the glass and light it well. Mark every scratch you plan to remove. Run the fingernail test to gauge depth and pick your starting grit from the table above.
Visual Inspection: Use good lighting. Determine if scratches are light (barely visible hairlines), moderate, or deep. Note if any scratch goes across a large area or in a tight corner -- these factors affect your approach.
Fingernail Test: Gently run a fingernail across the scratch. If your nail catches firmly, the scratch is significant (requires abrasive grinding). If it glides smoothly and the scratch is only visible, it might be a superficial scuff that cerium polishing alone can fix.
Identify the glass type. Tempered glass can be resurfaced but won't tolerate excessive heat or pressure -- and not all tempered glass is created equal. Laminated glass (windshields) has a plastic interlayer; deep grinding on windshields is not recommended in critical vision areas due to potential distortion.
Coatings Check: Check if the scratched surface has a coating (Low-E, reflective, or aftermarket tint film). Grinding will remove coatings. You may need to inform the client that a section of coating will be removed. Set expectations upfront.
Preparation -- Site Setup and Surface Prep
Protect Surroundings: Mask adjacent surfaces with tape or plastic. Cerium splatter gets everywhere and stains porous materials -- brick, wood, fabric. Cover window frames, nearby walls, and anything you don't want white-spotted. Lay drop cloths below the work area to catch drips. If working indoors, have a shop-vac ready to collect water/slurry runoff.
Safety First: Put on your PPE before you touch a tool (goggles, respirator, gloves, etc.). Ensure anyone assisting or nearby is also protected. If working on a vertical pane, set up your ladder or scaffold securely. Double-check that electrical cords are safely placed (and not in a puddle -- use a GFCI if working with water).
Clean the Glass: Thoroughly wash the scratched area and a wide surrounding zone. Any trapped dirt becomes an abrasive that creates new scratches. Use a standard glass cleaner and razor-scrape any stuck debris. If needed, clay bar the glass to remove things like sap or mineral specks. The surface must be as clean as possible.
Mark the Scratch Area: Using your wax pencil or tape, mark on the opposite side of the glass directly behind the scratch. Also outline an area slightly larger than the scratch which will be your initial work zone. For example, a 4-inch scratch might be worked in an ~8-inch diameter area to ensure blending.
Initial Photos (Optional): It's often useful to take a "before" photo of the scratch. As you work, the scratch will disappear gradually -- having a reference can assure you when it's fully gone and help communicate results to clients.
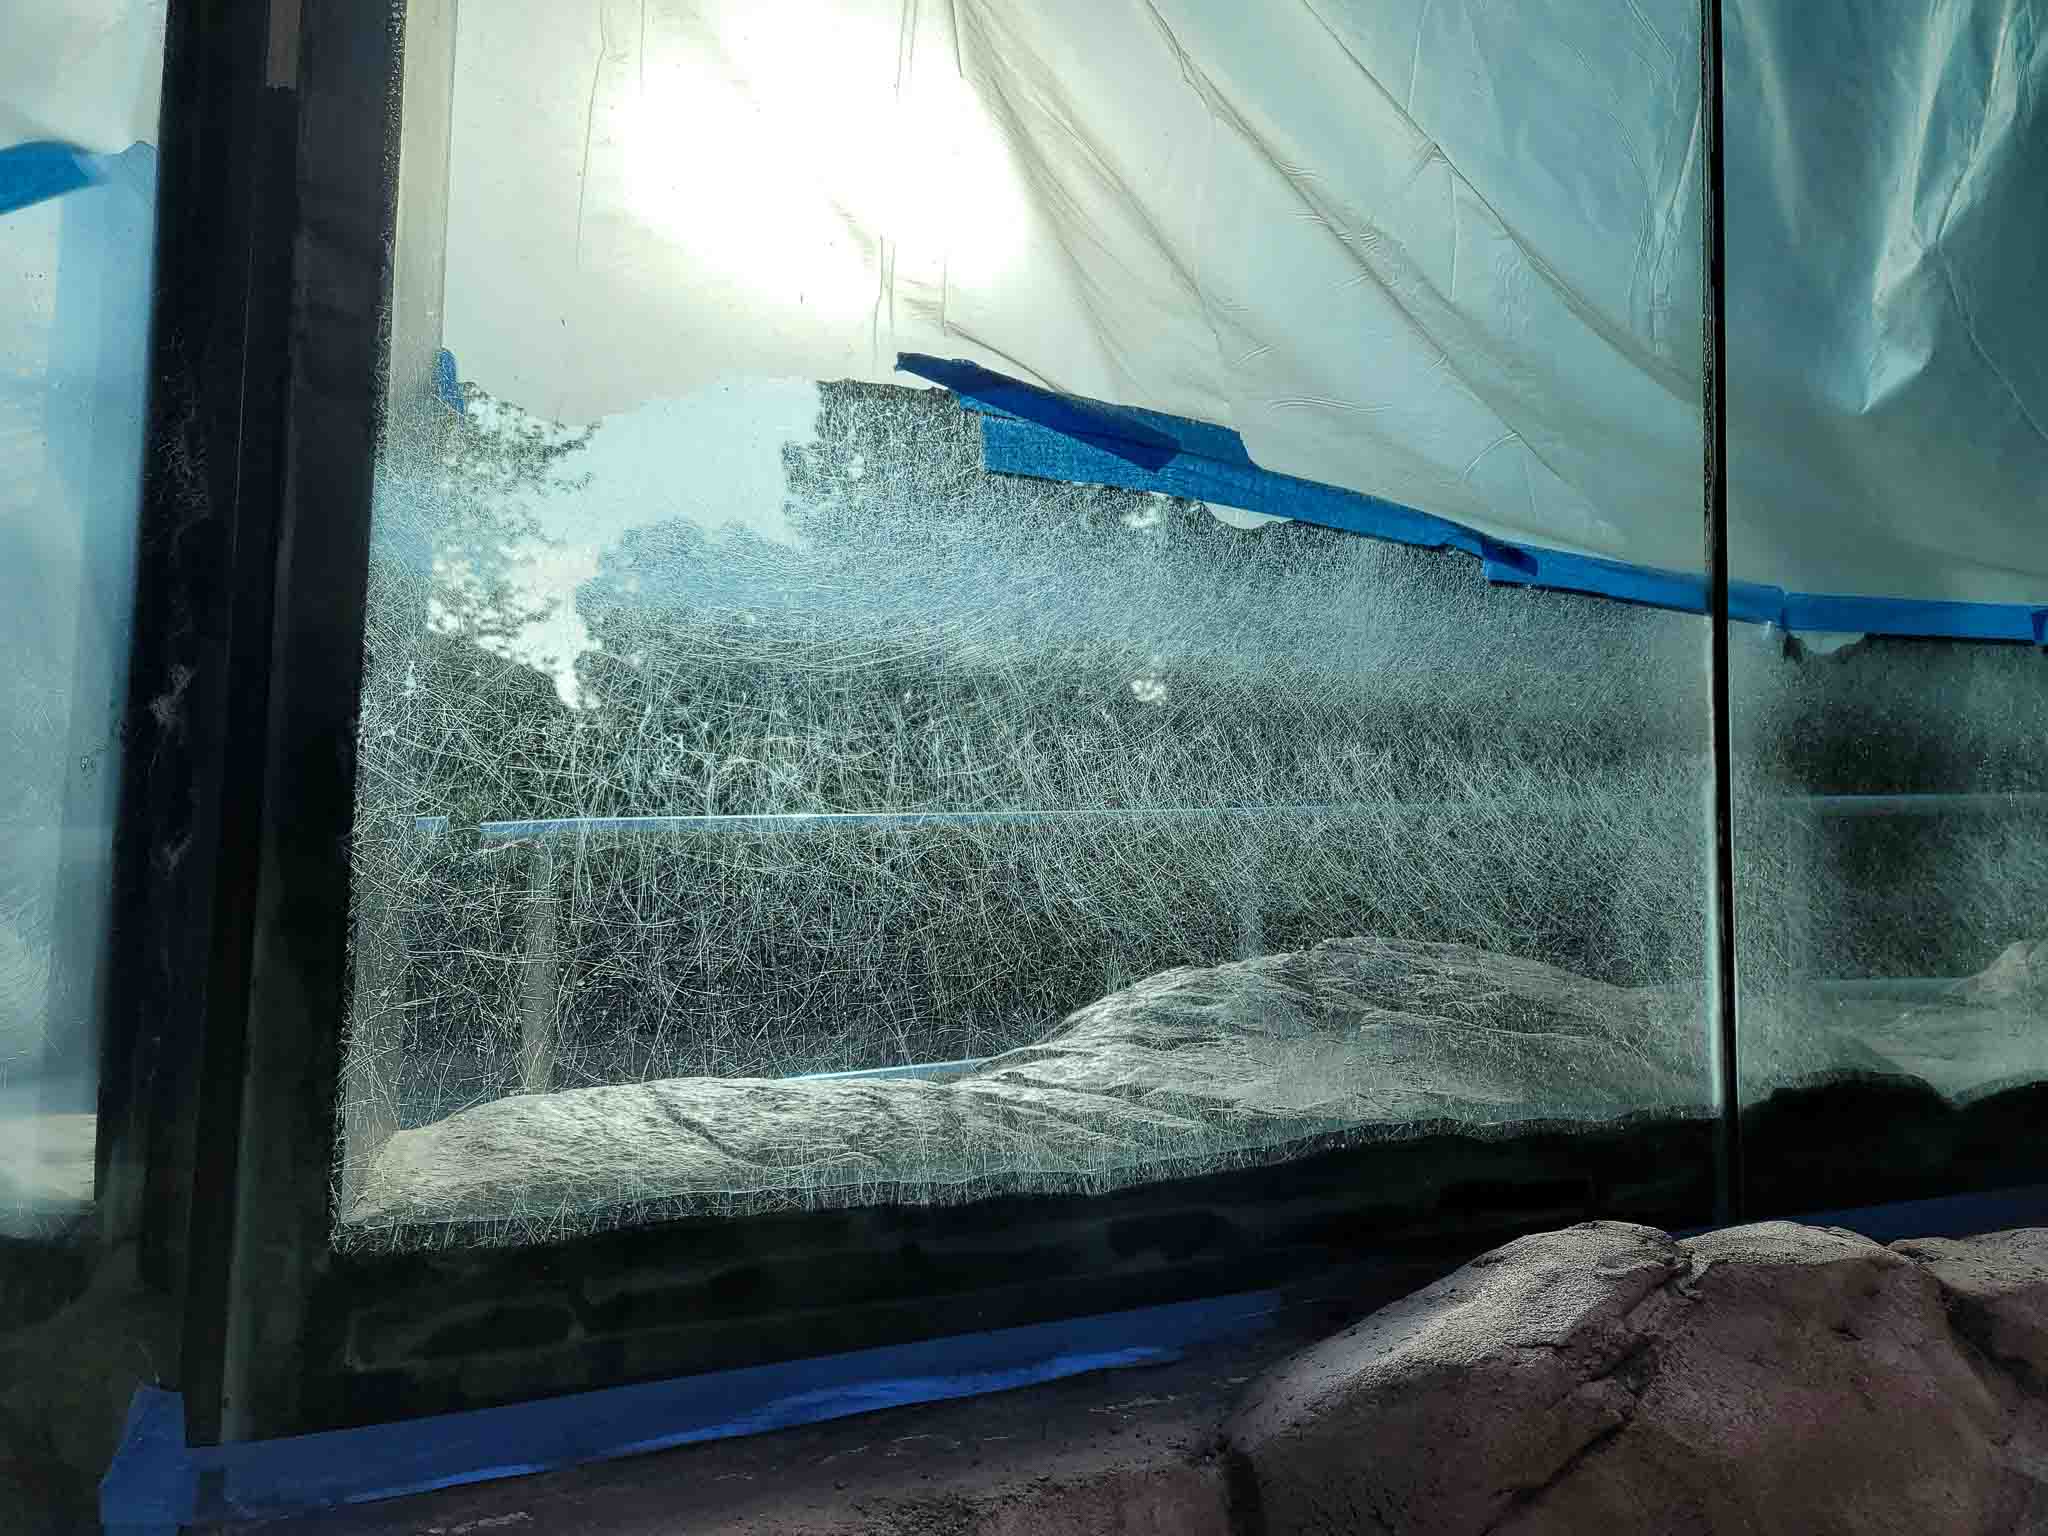
Coarse Grinding -- Erase the Scratch
If the scratch is deep (nail catches) or moderate, start with an abrasive grinding step to eliminate the bulk of the damage. Skip to Step 5 (Polishing) if the scratches are extremely light.
Select Grit: Based on your assessment, choose an appropriate starting disc: 80 grit for very deep, wide scratches or gouges (quite aggressive; use only if necessary). 120 grit for most medium-depth scratches. 220 or 320 grit if the scratch is just barely tactile. If unsure, err on the side of starting a bit coarser.
Attach Disc Securely: Mount the SiC disc to your backing pad. Ensure it's centered and flat. Set speed to 1000–1800 RPM. High speeds can overheat and even crack glass. If wet sanding, wet the glass surface with a spray bottle -- keep it wet throughout.
Work the Area Evenly: Grind in a uniform pattern over an area slightly larger than the scratch. Use overlapping circular motions, covering an area about 2x the scratch length in each direction. Use light to moderate pressure -- let the abrasive do the work. Keep the pad flat against the glass; do not tilt on an edge. Every 10–20 seconds, move to a slightly new position to feather out the glass removal.
Cross-Hatch Motion: Periodically change your motion. Do a series of horizontal strokes, then vertical, forming a cross-hatch pattern. This ensures no directional grooves remain and helps you gauge uniform coverage.
Monitor Temperature: Feel the glass surface with the back of your hand frequently (or use an IR thermometer). The glass will warm up from friction -- warm is okay, but it should never become uncomfortably hot. If it's getting too hot, stop and let it cool naturally. Do not spray cold water on hot glass, especially tempered glass -- the sudden temperature shock can crack it.
Clean and Check: After grinding for a minute or so, pause and wipe the area clean. The deep scratch should be turning into a uniformly frosted-looking patch. If the scratch line is still clearly visible, continue grinding until it's gone.
Do not advance to finer grits until the scratch is 100% gone. This is the single most important rule in the entire process. Any remaining groove would be too deep to remove with finer abrasives or polish.
Addressing Multiple Scratches: If there are several separate scratches on the pane, it's usually most efficient to coarse-grind each of them now (rather than completing one scratch through all steps at a time). For example, on a graffiti-tagged window with many marks, do the coarse grit on all marks first. This way you only have to set up for each grit once.
Progressive Refinement -- Smooth and Feather
Now it's time to smooth out the grinding marks from the coarse grit and feather the repair area into the surrounding clear glass. Rushing or skipping grits will make polishing much harder.
Medium Grit Step: Switch to the next finer disc (e.g., from 80 to 120, or 120 to 220). Clean the glass and pad between every grit change to prevent contamination. Expand slightly beyond the previous area to feather the edges of the frosted patch. If you ground a 4" circle, use your medium grit in a ~5–6" circle.
Fine Grit Step: Continue stepping up. After 220 grit, go to 320 or 400. If you have 600 or 800 grit, using them can further reduce polishing time. Each finer grit should be used over an area just a bit larger than the last. By the final sanding grit, you might be covering a region perhaps twice the size of the original scratch.
Feathering & Blending: This is the art of glass resurfacing. Some professionals lighten pressure at the outer perimeter to transition smoothly into untouched glass. Take care not to tilt the pad at the edges. Example feathering progression: 180 grit on a 4" area → 360 on 6" → 500 on 8" → 1000 on 10".
Addressing Distortion: Look through the glass at a distant object while moving your head. If you notice a fun-house mirror wobble, you focused too much in one spot. Correct this by expanding the area and evenly sanding to blend the slight depression. Going back one grit, then forward again, can resolve localized distortion.
Final Pre-Polish Check: Once finished with your finest sanding grit, thoroughly clean and dry the area. The glass should have a uniform, mild haze. There should be no distinct scratches visible. Shine a flashlight at a low angle -- you might see circular sanding marks, but they should be very fine and even. Touch the area: it should feel smooth.
Polishing -- Restore Full Clarity
Mix the Cerium Oxide Slurry: In a small bucket or squeeze bottle, mix cerium oxide powder with water. Consistency should be somewhere between "milk-like" thin slurry and creamy paste -- like runny yogurt. Start with water and add powder until you get a smooth mix.
Prep the Felt Pad: Attach your felt polishing pad to the tool's backing pad. If the pad is new, "charge" it by rubbing a little slurry into the surface by hand. Some pros scuff a new felt with sandpaper to raise the nap. The pad should be slightly damp before starting.
Apply Compound: Apply several pea-sized dollops of cerium slurry onto the felt pad and onto the glass surface. The motto is "less is more" -- you can always add more as you go.
Polish with Controlled Motion: Start at 1000–1500 RPM with light to moderate pressure. Move in slow, overlapping patterns -- circles, figure-8s, linear passes. Continuously move the polisher; do not stay in one spot. Cover the entire previously sanded area and slightly beyond.
Keep it Wet and Cool: Never let the cerium dry out on the glass while polishing. If it starts to look pasty or crusty, mist with water immediately. A squealing sound or jerking motion means it's too dry. The glass should remain cool to mildly warm.
Time and Coverage: Polish for a few minutes, then check progress. A rule of thumb: ~5 minutes of polishing per square foot. You'll notice the hazy area turning clear from the center outwards.
Inspect and Finish Polish: Stop, wipe off all slurry, and dry the glass. Inspect from both sides. If clarity is fully restored -- congratulations. If slight haze remains, resume with fresh slurry. If you see micro swirl scratches, try a brand new felt pad with fresh slurry, moving in different directions. High-purity cerium and proper technique generally avoid swirls.
Blend Edges: Run the polisher lightly over the perimeter to blend any slight differences in gloss.
Post-Resurfacing Clean-Up and Final Inspection
Thorough Clean-Up: Remove all cerium residue -- it dries to a white powder that hides in corners and crevices. If working outdoors, dried white slurry will be on drop cloths, nearby surfaces, etc. Wipe surfaces with a damp rag; cerium is insoluble and can be like fine chalk dust. Remove all tape and plastic coverings. Polish the glass one more time with a clean cloth for a perfect finish.
Final Inspection: Inspect from multiple angles and distances. Check for distortion by looking through the glass at distant straight lines -- view distant straight lines and move your head side to side. The repair should be completely invisible. Have a second pair of eyes verify that no distortion is present.
Apply Protective Measures (Optional): For high-risk locations (storefronts prone to graffiti, high-traffic areas), discuss protective films or anti-graffiti coatings with the client. A transparent anti-scratch film can preserve the glass surface from future damage. A nano-coating (hydrophobic coating) makes the glass easier to clean and slightly more resistant to fine abrasions.
Maintenance Advice: Advise on soft cloths, non-abrasive cleaners, no razor blades on the repaired area. Proper cleaning prevents re-scratching.
Real-World Interactive Case Studies
Interact with the sliders below to see the immediate transformation.

Advanced Techniques and Best Practices
Achieving top-tier results -- on par with or better than industry leaders -- requires not just following the steps, but mastering the subtleties of glass resurfacing. Below are advanced techniques and insider best practices that will elevate the quality and efficiency of your work.
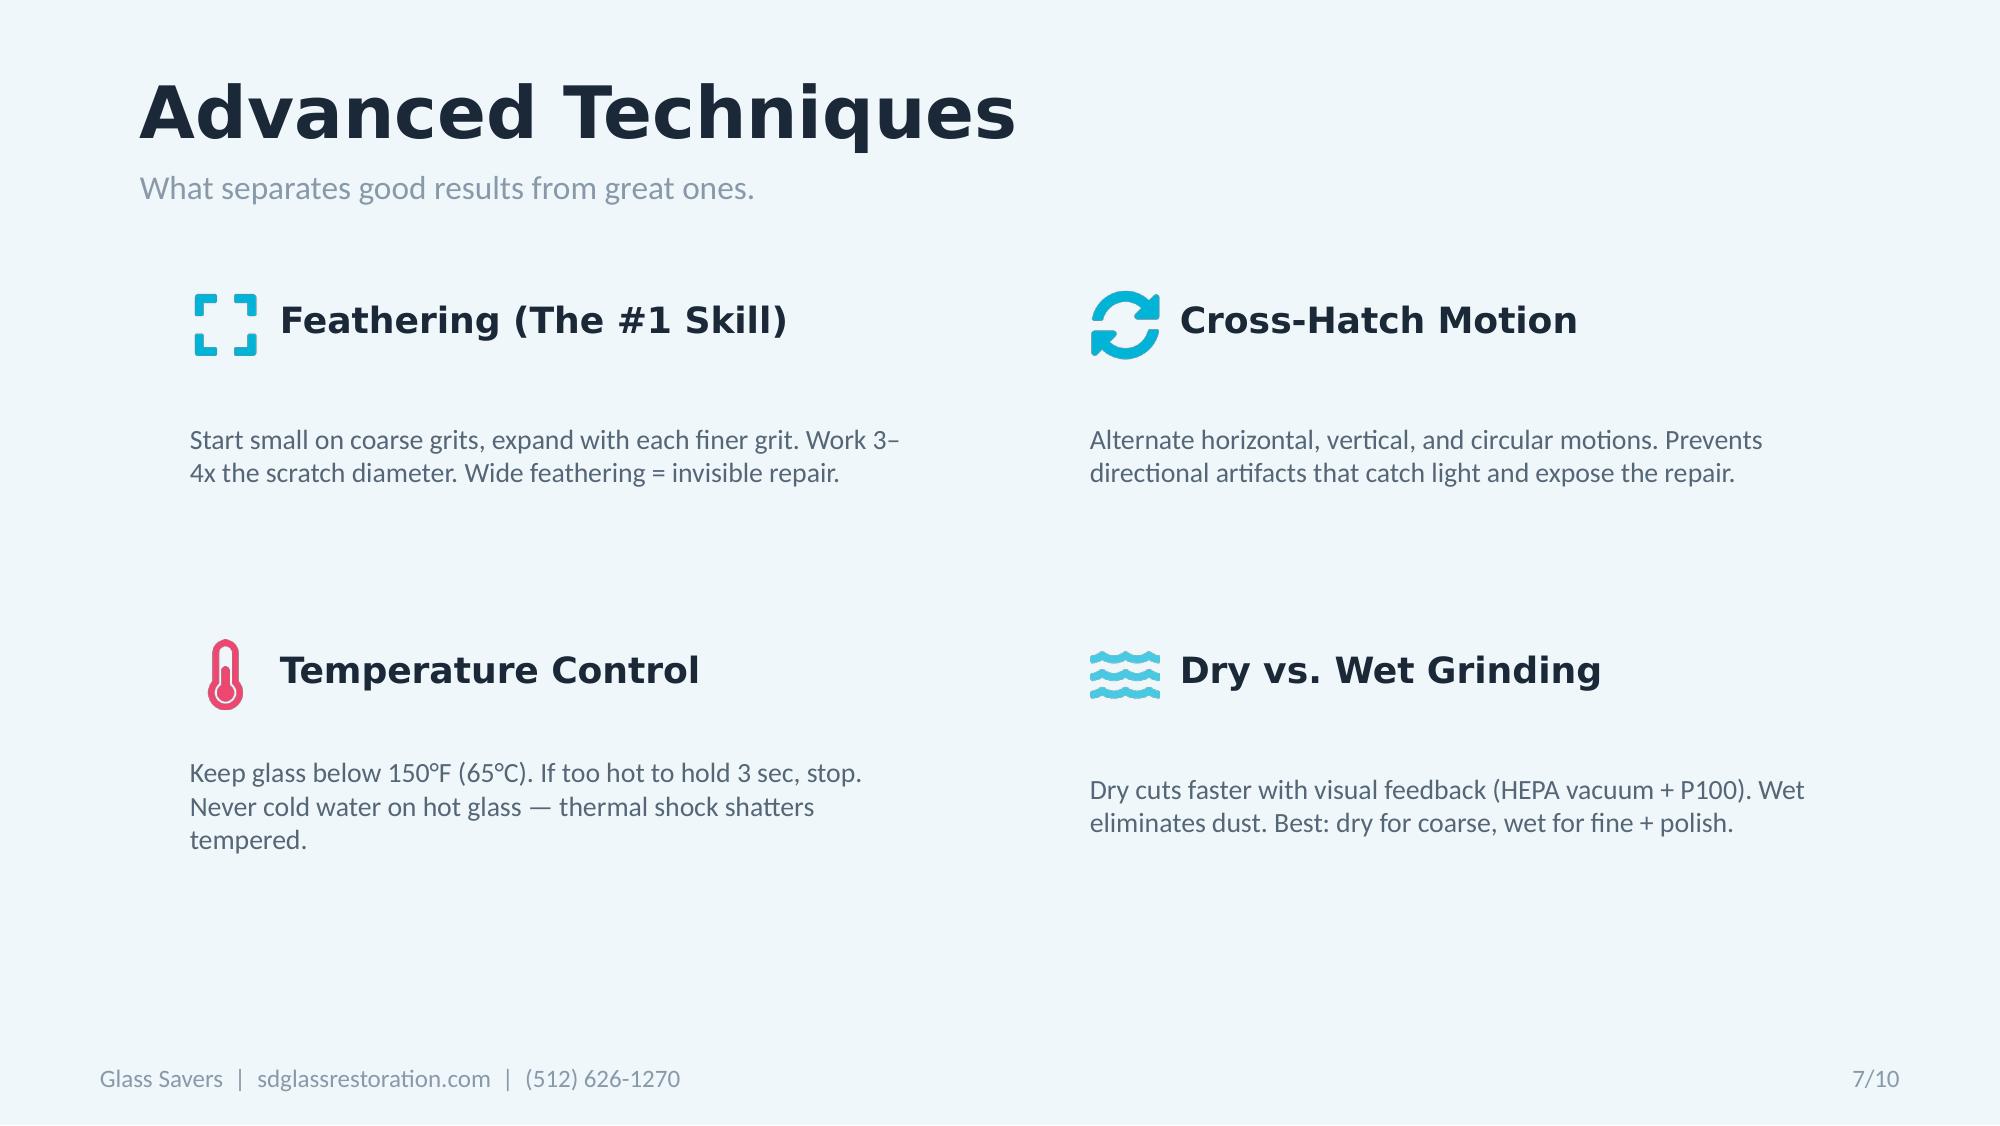
Feathering (The #1 Skill to Master)
Feathering is the difference between a repair that's invisible and one that creates a visible "lens" effect. It is the gradual reduction of pressure and blending out at the edges of your work area. Expert technicians might start with a 4" grind area at 80 grit, expand to 6" at 120 grit, 8" at 220 grit, 10" at 320 grit, then polish 12" -- each stage feathering further out.
This avoids a noticeable "pocket" in the glass. When done right, the transition from restored to original surface is imperceptible. A viewer 20 feet away should not spot any patched area. Tight feathering = visible distortion. Wide feathering = invisible repair. This is exactly what makes high-end residential repairs indistinguishable from new glass. Practice feathering by drawing concentric circles on a scrap glass and trying to grind them evenly away.
Cross-Hatch and Multi-Directional Polishing
Consistently changing your motion can prevent any directional artifacts. For grinding, using a cross-hatch (both clockwise circles and counter, or up/down then left/right passes) evens out removal. For polishing, occasionally switch to a different pattern (e.g., do a set of vertical passes, then horizontal). This helps eliminate any micro-scratch pattern from only going one way. It's like sanding wood with the grain and then at a slight angle to ensure no grain lines -- same idea for glass.
Temperature Control
Heat is your biggest enemy. Not only can it crack glass (especially tempered), but high heat can "orange peel" the glass surface or cause warping. Keep glass below 150°F (65°C) at all times. Some pros mark a target area and use an IR thermometer every 30 seconds during heavy grinding. If approaching ~60°C (140°F), pause.
For large projects, two technicians can alternate grinding so one area cools while another is worked. This "leapfrog" method keeps productivity up without overheating any single pane. Also, remember the glass edges and corners release heat slower (less mass around them), so be extra careful there. Never pour cold water on hot glass -- allow gradual cooling if overheated.
Dry vs. Wet Grinding
Dry grinding cuts faster and gives you immediate visual feedback. We typically dry-grind with Mirka Abralon using HEPA vacuum containment and P100 respirators. However, dust management is crucial. Read more about our approach in Glass Restoration: Cutting Through the Noise.
Advanced Technique: Dry vs. Wet Grinding -- Full Breakdown
If you opt for dry method:
- Use a vacuum shroud or at least hold a vacuum nozzle near the work area to capture dust.
- Wear at least a P95 or P100 respirator -- glass dust is essentially fine silica and can harm your lungs. Glass dust is amorphous silica, less dangerous than crystalline, but it still irritates eyes, skin, and lungs.
- Clean up dust thoroughly; it's slippery on floors and can settle on nearby objects.
Wet sanding virtually eliminates dust but can be messier with slurry. Many professionals use a hybrid approach: dry grind for coarse removal, then switch to wet for fine sanding or polishing. This gives the speed of dry grinding and the cleanliness of wet finishing. Experiment to see what works best for your workflow and environment.
Use of High-Purity Materials
If polishing results are not crystal clear, evaluate your consumables. Low-grade cerium oxide can contain impurities or larger particulates that leave micro-scratches or take longer to polish. Investing in optical grade cerium (99.9% purity) ensures you're using the same caliber material as the top restoration firms. Keep your felt pads dedicated to cerium use only -- if you use a pad for metal polishing, do not reuse it on glass as it may embed abrasive grit.
Pad Maintenance
During polishing, the felt can load up with glass particles and spent cerium. Dress the pad occasionally by scrubbing it with a stiff nylon brush or using a file to rough it lightly. A clean pad works more effectively and runs cooler. After each job, wash pads with water and mild soap, rinse thoroughly, and let them dry -- they're reusable many times.
Advanced Technique: Preventing and Correcting Optical Distortion
To ensure quality, you want absolutely no distortion. A glass that's been overheated or unevenly ground might look fine at first but could have internal stress. To check:
- Look through the glass at lined paper or venetian blinds in the distance; move your head side to side. Any "wiggle" in the lines at the repaired spot indicates distortion.
- If distortion is detected early, correct it by re-grinding a larger area around it.
- If detected after polishing, go back to sanding (it's okay to interrupt polishing, re-sand, then re-polish) to fix it.
- Take note of how the distortion happened to avoid it next time -- usually it's from focusing too long on a small deep scratch without feathering enough.
Advanced Technique: Avoiding Swirl Marks
If you notice circular swirls after polishing, it could be due to:
- Polishing with too high speed or too much pressure -- lighten up and slow down; let the cerium do the work.
- Dried slurry dragging under the pad -- always keep it wet.
- Using a heavy wool pad or foam pad instead of felt -- stick to firm felt as recommended.
A trick to remove very fine remaining swirls is a final polish with a slightly softer medium like jeweler's rouge (iron oxide) or a finer cerium mix. Using a very thin felt or even a smooth cork pad for final buffing with cerium can sometimes remove the last hints of swirls. However, these steps are rarely needed in field work if your primary polishing was done correctly.
High-Volume Workflow Optimization (20–50+ Windows)
When facing large projects such as office buildings, malls, or extensive graffiti vandalism across many windows, efficiency is key. You want to deliver quality results on a big scale without exhausting your crew or blowing the budget. For more on our approach to big jobs, see large scale glass resurfacing services.
Batch Your Work
Perform tasks in batches rather than window-by-window. For example, if 30 windows have scratches, do the assessment and marking for all windows first. Then do all the coarse grinding on all windows. Next, medium grit on all, and so on, finishing with polishing last. This minimizes tool changeovers and ensures a rhythm. It's much faster to repeat the same motion on different windows (muscle memory) than to keep switching modes.
Logical Sequencing
Plan a route or sequence (especially in a multi-room or multi-story site). The goal is to avoid backtracking. If wet polishing, you might leave one window drying while moving to the next. If you have to move scaffolding or ladders, do all work reachable from one setup before moving it. Treat the whole project like a single production line.
Adequate Manpower
Large jobs are not one-person shows. Ideally, have teams of 2–3 for big projects. One can operate the grinder, another manages water supply, cleanup, and spotting from the opposite side (very helpful for big glass -- someone inside can point out areas still hazy). Rotate roles to reduce fatigue; polishing for hours can be physically tiring, so swap out operators regularly to maintain consistency.
Training and Consistency
When multiple techs are working, ensure everyone uses the same grit sequence, pressure, and technique. A brief training at the start of the project to standardize the approach can save a lot of rework. Perhaps have each person fully restore one window under supervision to verify their result meets the standard before splitting up.
Equipment for Scale
Invest in or rent specialized equipment if needed. Water feed systems can save time on rewetting and cleanup. Have multiple grinders/polishers available so one can cool down while another is in use. Dedicate one machine for grinding and one for polishing to avoid cross-contamination of cerium with grit.
Consumable Stock
In large jobs, you'll go through abrasives and cerium quickly. Track usage rates (e.g., "each 80-grit disc did ~10 sq ft of glass") so you can forecast and have plenty of extras ready. This prevents downtime due to running out of materials.
Time Management
Break the project into daily goals (e.g., "Day 1: grind all scratches on floor 1; Day 2: finish fine sanding floor 1 and start polishing," etc.). Factor in that each subsequent stage takes progressively longer per window -- polishing might take as long as all prior steps combined. Schedule accordingly.
Interference and Coordination
In an occupied building, coordinate with occupants -- do noisy grinding after hours, and quieter polishing in daytime. Use signage or barrier tape to keep people away from work areas. Assign someone to manage extension cords, hoses, and general site safety as the work area shifts around.
Quality Control
On large projects, periodically inspect completed panes (maybe every 5th window) in detail before the whole crew moves on. Catching any issues early allows you to adjust the process or re-train crew if needed. It's easier to re-polish one window now than realize at the end that 50 windows have a subtle distortion.
Quality over Speed: Even in a rush, do not skip essential steps. One distorted window in a set of 50 will stand out and tarnish the project. It's better to have a consistent, slightly slower process that yields uniform results than an erratic fast approach that might fail on a few.
Document Progress
Keep notes on which windows are completed, which are in-progress. On huge jobs, it's surprisingly easy to lose track. Use numbered stickers on windows or a checklist. This also helps if multiple teams are working -- avoid duplicate effort or missed spots.
Safety Protocols and Regulatory Compliance
Glass resurfacing involves hazards that must be managed to protect workers and comply with regulations. Safety is always the top priority in any professional job. This isn't optional reading. Glass dust is silica. Power tools near water are a shock hazard. Take this section seriously.

Personal Protective Equipment (PPE)
| Hazard | Protection | Details |
|---|---|---|
| Glass particles & cerium splatter | ANSI-rated safety glasses or goggles. Full face shield for heavy grinding. | Tiny glass chips and cerium splatter are common. For heavy grinding, a full face shield is wise, as glass dust and larger fragments can fly off disc edges. Never compromise on eye safety. |
| Silica dust | NIOSH-approved P100 (HEPA) respirator | OSHA mandates keeping silica dust exposure below 50 µg/m³ (8-hr TWA). Grinding glass (especially dry) generates fine silica dust, which can cause silicosis if inhaled. Don't take chances; even if wet sanding, wear a mask during cleanup of dried slurry dust. |
| Noise (80–90 dB) | Foam earplugs or earmuffs | Over a full day, 80-90 dB is above safe limits. Use hearing protection. This also reduces fatigue. |
| Cuts from glass edges | Cut-resistant gloves during handling/setup | Wear gloves when handling glass edges or if the panel is already damaged. Some techs go bare-handed while polishing for dexterity, but have gloves handy. Snug nitrile gloves keep cerium off skin (it can be drying/irritating with prolonged contact). |
| Skin exposure | Long sleeves or coveralls | Wear long sleeves during grinding to avoid itching from glass dust. An apron or disposable suit for messy polishing. No loose clothing or jewelry that could catch in spinning tool. Tie back long hair. |
Electrical Safety (Water and Tools)
Mixing water and power tools requires caution:
- Use GFCI (Ground Fault Circuit Interrupter) adapters on extension cords if working outdoors or near water. This cuts power instantly if any electricity leaks.
- Keep power connections off the ground and away from puddles. Use drip loops in cords.
- Check tool cords for cuts or damage in insulation -- repair or replace before use in wet work.
- If it begins raining while doing outdoor work, stop immediately.
Ventilation and Dust Control
If doing a lot of dry grinding in an enclosed area, you must manage the dust. Use exhaust fans or an air scrubber. OSHA requires silica dust exposure below 50 µg/m³ for construction work. Even small jobs produce more dust than you'd expect. OSHA might require a written exposure control plan for silica if you regularly engage in this work -- including using wet methods or vacuums. When in doubt, err on the side of providing extra ventilation or just go wet to keep dust down. Remember, silica dust is a known health hazard -- take it seriously.
Ergonomics and Tool Handling
Polishing can be physically demanding. Train workers on proper lifting. Encourage rotating tasks to avoid repetitive strain. Use tools with auxiliary handles for better control. Avoid awkward body positions -- if a scratch is at the bottom of a big window, kneel or sit on a low stool rather than bending over for 30 minutes.
Glass Handling and Stability
Only work on glass that is stable and secured. If a window is loose in its frame or a glass tabletop is wobbly, fix that or lay the glass flat before applying pressure. If you suspect a pane has internal damage (cracks, chips), be extremely cautious -- grinding a pane with an existing crack can cause it to run and shatter. Remember tempered glass, if it breaks, will shatter suddenly into tiny pieces -- always assume that risk and stay clear of the direct line of breakage.
Environmental and Housekeeping
Cerium oxide and glass slurry are non-toxic, but you shouldn't wash large amounts down drains as it can settle and clog. Collect waste in a container or let it dry and sweep up for disposal. Never leave slurry on a client's property; dried cerium on brick or concrete can be a pain to remove. Good housekeeping during the job prevents slip hazards (wet floors) and makes final cleanup easier.
Regulatory Compliance
- Silica Dust Rule (OSHA): Have a plan to mitigate dust. Document that you provided respirators and training to workers about silica. Keep Safety Data Sheets (SDS) on hand for cerium oxide.
- Waste Disposal: Check local regulations. Usually cerium and glass dust can go with regular construction debris. If you produce wastewater with cerium, you may need to filter or containerize it.
- Ladder/Scaffold Safety: Ensure any work at height follows OSHA/local guidelines (tie off ladders, guardrails on scaffolds, personal fall arrest systems if on suspended scaffolds).
Emergency Prep
Have a first aid kit on-site. If cerium or glass dust gets in eyes, rinse immediately with clean water or saline for at least 15 minutes. Know where the nearest hospital is before starting work. It's rare to have emergencies in polishing work, but being prepared is part of professional responsibility.
Treat safety as an integral part of the job, not an afterthought. When workers feel safe, they can focus on doing quality work. Compliance with safety regulations protects your business from fines and keeps your team healthy for the long run.
Troubleshooting Common Issues (Challenges and Solutions)
Even with the best process, you may encounter some challenges. For a deeper dive, see why most glass scratch repairs fail.
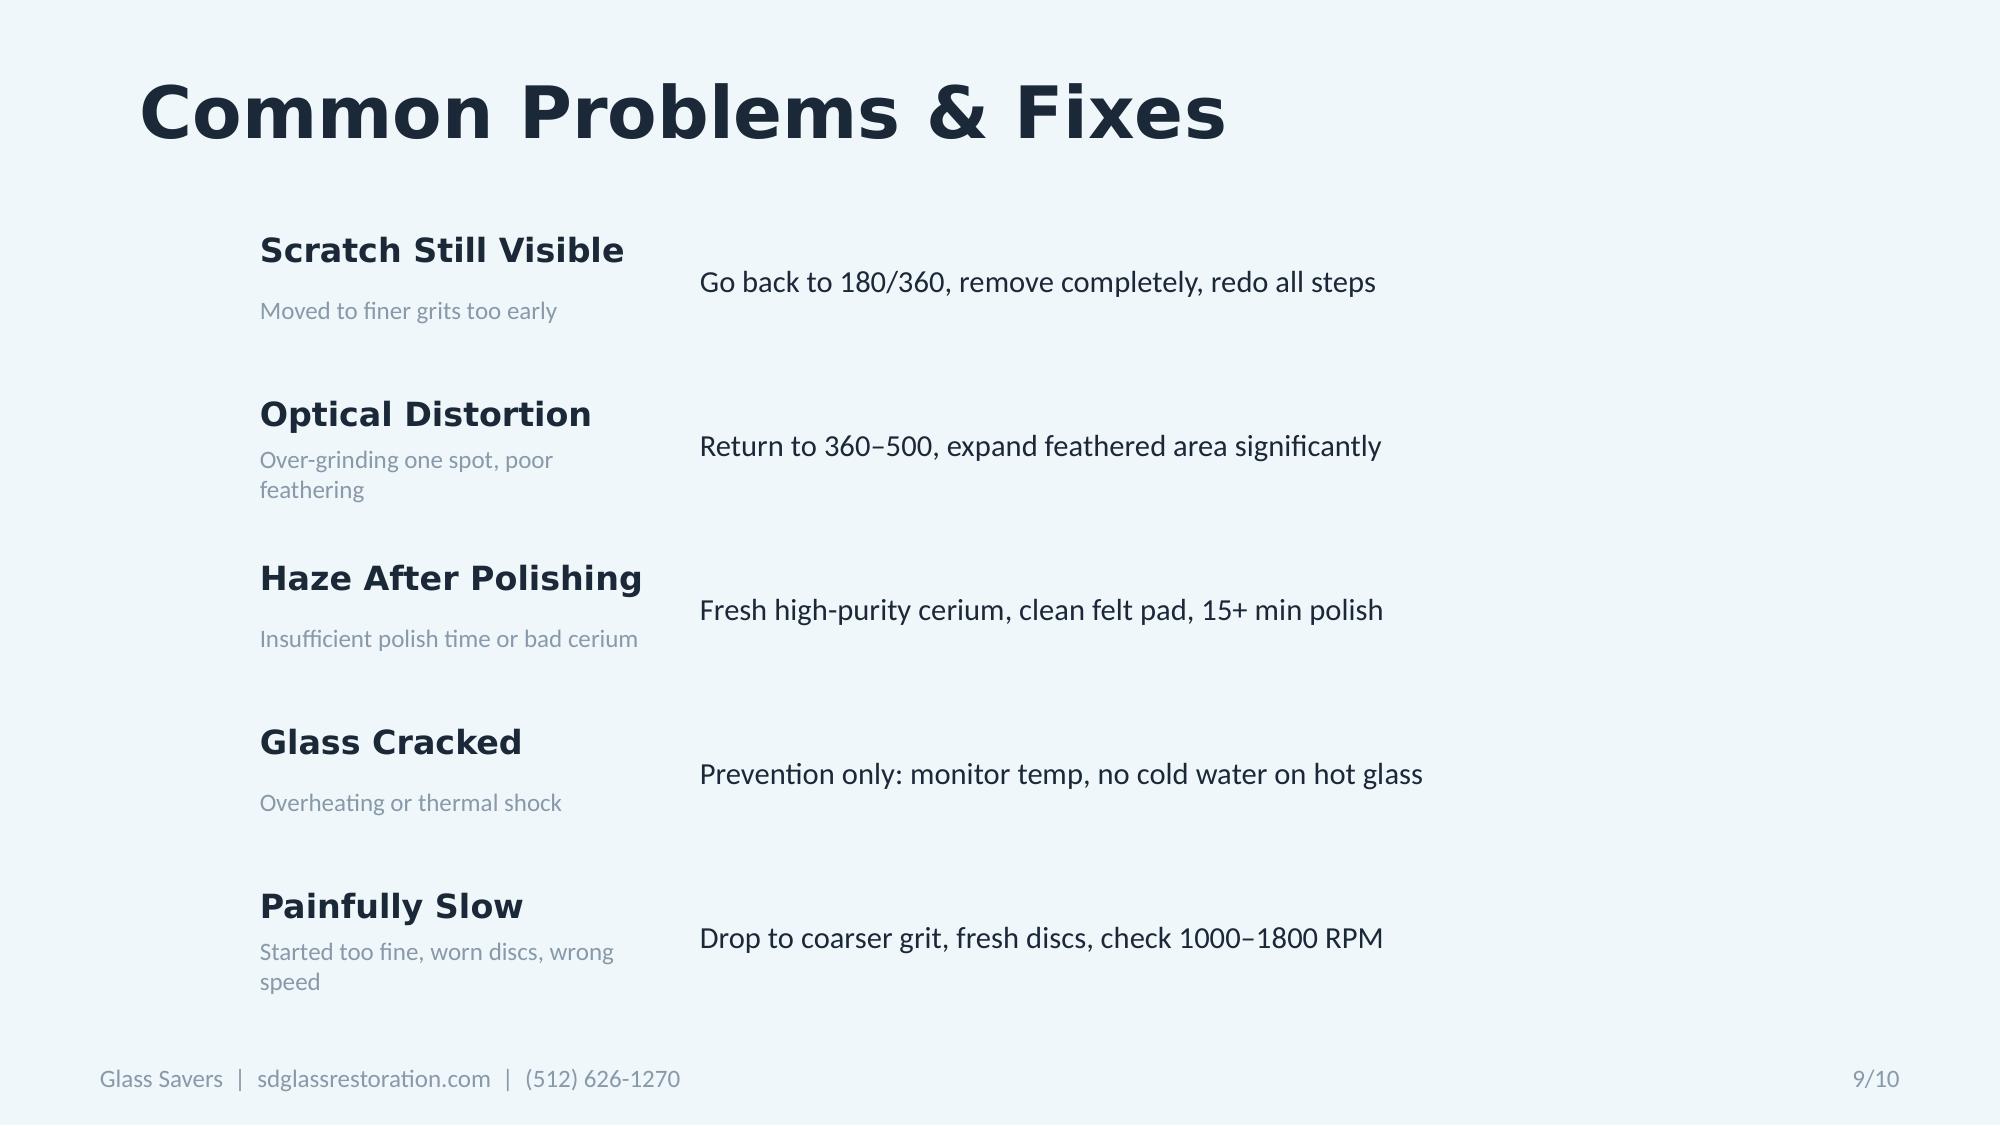
Issue 1: Scratch Not Fully Removed (Visible After Polishing)
SymptomsAfter completing the process, a portion of the original scratch is still faintly visible, especially in raking light. Or you polish and the scratch "reappears" when the glass dries -- water filled the remaining groove and hid it.
CauseNot grinding aggressively enough initially, or moving to finer grits too soon. A deep scratch was partially removed but not 100%.
FixGo back to a coarse or medium grit that can reach the bottom of the scratch and remove it entirely. Then step up and re-polish. Inspect carefully after the coarse stage (dry the glass and use a fingernail to feel if any groove remains) before moving on. If you can still catch the scratch with your nail at all after a grit, do not proceed to the next grit.
Issue 2: Optical Distortion ("Wavy" or "Lens" Effect)
SymptomsThe glass surface appears wavy when looking through it. Straight lines bend or distort at the repaired area, like a fun-house mirror section.
CauseOver-grinding a concentrated area (making a slight depression) or uneven feathering. Running the grinder too hot can relieve stresses unevenly in tempered glass leading to warpage. More glass was removed from one spot than surrounding.
FixIf detected early (during sanding), correct by expanding the feathering -- grind a wider area around the low spot. If detected after polishing, re-mask, re-sand with medium grit, blend the distorted edges further out, then refine and polish again. Use a straightedge on the glass if needed. The goal is a very gradual change in thickness rather than an abrupt one. The mantra is: remove the scratch as quickly and in as few passes as possible to avoid unnecessary removal of surrounding glass.
Issue 3: Haze or Fine Hairline Scratches After Polishing
SymptomsArea looks clear when wet, but dries to a dull haze or micro-scratch pattern. Under light, tiny swirl marks or cloudy appearance compared to surrounding glossy glass.
CauseIncomplete polishing, final sanding grit too coarse, contamination (grit on felt pad), low-quality cerium, or using insufficient cerium or a pad that's too hard.
FixPolish more with fresh, high-purity cerium on a clean felt pad. If haze persists after 10-15 minutes on a small area, you may not have sanded fine enough. Reintroduce a finer sanding step (e.g., 600 or 1000 grit wet sandpaper), then re-polish. Check that you're using high-purity cerium -- lower grades sometimes never achieve perfect clarity on tempered glass. Also ensure you thoroughly clean the glass; sometimes what looks like haze is just residual cerium film.
Issue 4: Swirl Marks or Circular Fine Scratches
SymptomsUnder sunlight or a flashlight, circular patterns of faint scratches visible, typically the size of your polishing pad. Hard to see straight-on but visible at certain angles.
CausePad contamination with a larger abrasive piece, dried slurry causing micro-cutting, high-speed buffer with wool pad (not recommended on glass), or leftover circular sanding marks not fully polished out.
FixPolish in a different pattern with a fresh pad. Try hand-buffing with felt or cork block and cerium in linear motion across the swirls. If using machine, use plenty of slurry at low speed and move in different directions (diagonals rather than circles). A tad of dish soap in cerium slurry during final polish can reduce friction and help remove very fine swirls. Ensure the pad is perfectly clean.
Issue 5: Glass Cracked or Shattered During Process
SymptomsLoud pop, glass develops a crack, or tempered glass collapses into granules.
CauseOverheating is the #1 cause -- thermal stress cracks glass. Applying cold water on hot glass induces thermal shock. Pre-existing damage (edge chips, small crack) spread due to vibration. Excessive force on thin/tensioned panel. On tempered glass, grinding too deep in one spot can hit the tension layer and trigger breakage.
FixOnce cracked, the glass must be replaced. Focus on prevention: work with moderate speeds and pause to cool. Keep glass temperature differentials low -- don't let one part of a tempered pane exceed 55°C while edges remain at 20°C. Don't concentrate force near glass edges or corners (weakest points). If working on laminated glass, stick to polishing only. Always inspect first: if there's a chip, consider terminating the scratch with a tiny drill hole to prevent crack propagation. Keep people out of the trajectory if glass were to shatter.
Issue 6: Cerium Oxide Residue or Staining
SymptomsWhite or light orange residue on window frames, brick, floors, or glass has powdery film. Slurry dried in corners or on car paint below.
CauseCerium oxide splatter not cleaned while wet. Sun bakes it onto surfaces quickly.
FixImmediate cleanup is best: keep a wet rag handy and wipe splatters before they dry. For dried cerium: on glass, use a razor scraper or nylon scrub pad with water. On rough surfaces (concrete, brick), use a stiff brush and water -- mild vinegar solution can help. For car paint, re-wet gently and use a soft cloth (dry cerium is abrasive). Vacuum piles of dried powder -- avoid sweeping into the air. Prevention: cover areas or use targeted polishing to minimize mess.
Issue 7: Slow Progress (Inefficiency)
SymptomsScratch removal taking far longer than expected -- grinding barely makes a dent, or polishing isn't clearing the haze.
CauseUsing too fine a grit to start on a deep scratch, worn-out abrasives, insufficient pressure, low-quality cerium, or tool not at proper speed.
FixDrop down one grit level (e.g., from 120 to 80). Use fresh abrasive discs -- they dull with use; a disc might only grind a certain square footage before needing replacement. Increase pressure slightly (within safe limits) or speed if heat is under control. Verify slurry consistency for polishing -- too watery or too thick are both ineffective. On large areas, use a larger pad or polisher. Choose tool size according to scratch area size.
Issue 8: Client Expectations / Unachievable Results
SymptomsClient expected brand-new appearance, but there's a faint distortion or unavoidable artifact. Or extremely deep scratch was vastly improved but slight trace remains.
CauseCommunication gap -- damage was at the edge of what can be fixed. Client envisioned perfection when only 95% improvement was feasible.
FixManaging expectations is key. Always explain to clients (especially for severe scratches or certain glass types) what result is likely. Tempered glass with deep fabricating debris scratches may have slight wavy patterns inherently after heavy resurfacing. If a scratch is so deep it's almost a crack, suggest glass replacement rather than attempting a marginal repair. It's better to walk away or replace than to have an unhappy customer after much effort.
Comparison with Top Industry Methods
How does the process outlined in this guide stack up against the methods used by leading glass resurfacing companies? Here's the comparison.
Technique and Results
Top resurfacing companies like Glass Savers have developed systems to achieve distortion-free scratch removal, which is exactly what we aim for here. Their process involves a multi-step dry grinding approach with a rotary polisher followed by cerium polish, using a grit range from 80-1000 -- very similar to our multi-grit regimen. They advertise no haze or swirls, which we accomplish by emphasizing fine finishing and proper polishing. Our guide effectively teaches you to handle both light and deep scratches with professional-grade results.
Equipment: Cost and Accessibility
Professional kits can cost $1,500–$5,000 for the full setup (pads, compounds, sometimes training). Our guide shows how to assemble a kit with common components: a quality polisher (~$225–$300), abrasives and cerium (~$225 to start), pads and PPE. Total investment of a few hundred dollars rather than thousands, yet achieving the same results with skill. This lowers the barrier for entrepreneurs.
Flexibility
By understanding the underlying process, you are not locked into one system's limitations. Some one-step polish kits struggle with deep scratches. With your own process, you can decide to incorporate as many steps as necessary -- if a scratch needs to start at 60 grit, you can do that. You can also tackle odd situations -- curved glass, large surface areas -- by selecting different tool sizes or custom approaches.
Quality and Finish
This guide emphasizes premium cerium, careful technique, and thorough polishing. Many quick kits are optimized for "no distortion" sometimes at the expense of leaving faint haze. Our multi-step approach should leave the glass optically perfect -- indeed possibly clearer than adjacent areas.
No Distortion Guarantee
Companies like Glass Savers tout a "No Distortion Guarantee," achieved through their dry-grind method and feathering expertise. This guide gives you the exact knowledge to also avoid distortion. If you follow those principles, you can confidently guarantee your clients the same -- that their glass will look as if the scratch never happened.
Transparency vs. Proprietary
One advantage of using this guide is knowledge transparency. Some kits obscure what abrasives they use (relabeling grits). Here, you know it's silicon carbide at specific grits and cerium oxide -- nothing magical, just science. This means if something isn't working ideally, you can adapt. Being nimble and knowledgeable can yield better-than-standard results in challenging scenarios.
When to Consider Specialized Kits/Tools
If your business grows, you might incorporate some specialized tools for convenience. Water feed hand pieces are handy for on-site auto glass polishing. Some specialized abrasives might last longer than generic ones. Many techs mix and match (using specialized disks on their own grinder). The goal is to produce the best result in the shortest time, so remain open to new products while understanding you can achieve the core result without them.
In conclusion, the methodology presented here is on par with the best in the glass restoration industry. The key differentiator is that you're building skill and understanding, rather than depending on a single proprietary system. A trained technician following this guide's process can achieve the same crystal-clear, distortion-free finish that clients expect when they call the "big names."
Professional Reference: Glass Resurfacing Standards
The techniques described in this guide are based on over 17 years of professional glass restoration experience across residential and commercial projects.
- Typical scratch removal rate: 90–95% of all scratches can be fully removed
- Common abrasives: Silicon carbide (SiC), aluminum oxide, Mirka Abralon foam-backed discs
- Polishing compound: Cerium oxide (99%+ optical grade purity)
- Glass types restored: Tempered, laminated, annealed, low-iron, float glass
- Applications: Residential windows, storefront glass, architectural panels, glass tabletops, shower doors, glass railings
- Cost savings vs. replacement: Typically 50–80% less than full glass replacement
- Material removal per repair: 50–100 microns (negligible vs. 6mm standard pane thickness)
- Temperature limit: Never exceed 150°F (65°C) during grinding
- Speed range: 500–2000 RPM (grinding), 1000–1500 RPM (polishing)
- Quality standard: No visible haze, swirls, or optical distortion at any viewing angle
Quick Field Reference Card
| Reference | Details |
|---|---|
| Grit Chart | Extreme → 80 SiC. Deep (nail catches) → 180 Abralon. Medium → 360. Light → 500. Very fine → 1000 or cerium only. |
| Temperature | Never exceed 150°F (65°C). Back-of-hand test: if you can't hold it 3 seconds, stop. |
| Slurry Consistency | Mix cerium oxide with water to "runny yogurt" consistency. Keep wet at all times. |
| Common Mistakes | Too fine → go coarser. One spot → feather wider. Dried polish → keep slurry wet. Haze → polish longer or back to 1000. |
| Before/After Portfolio | Keep completed repairs on your phone. Our full case study gallery has 67+ examples. |
Frequently Asked Questions
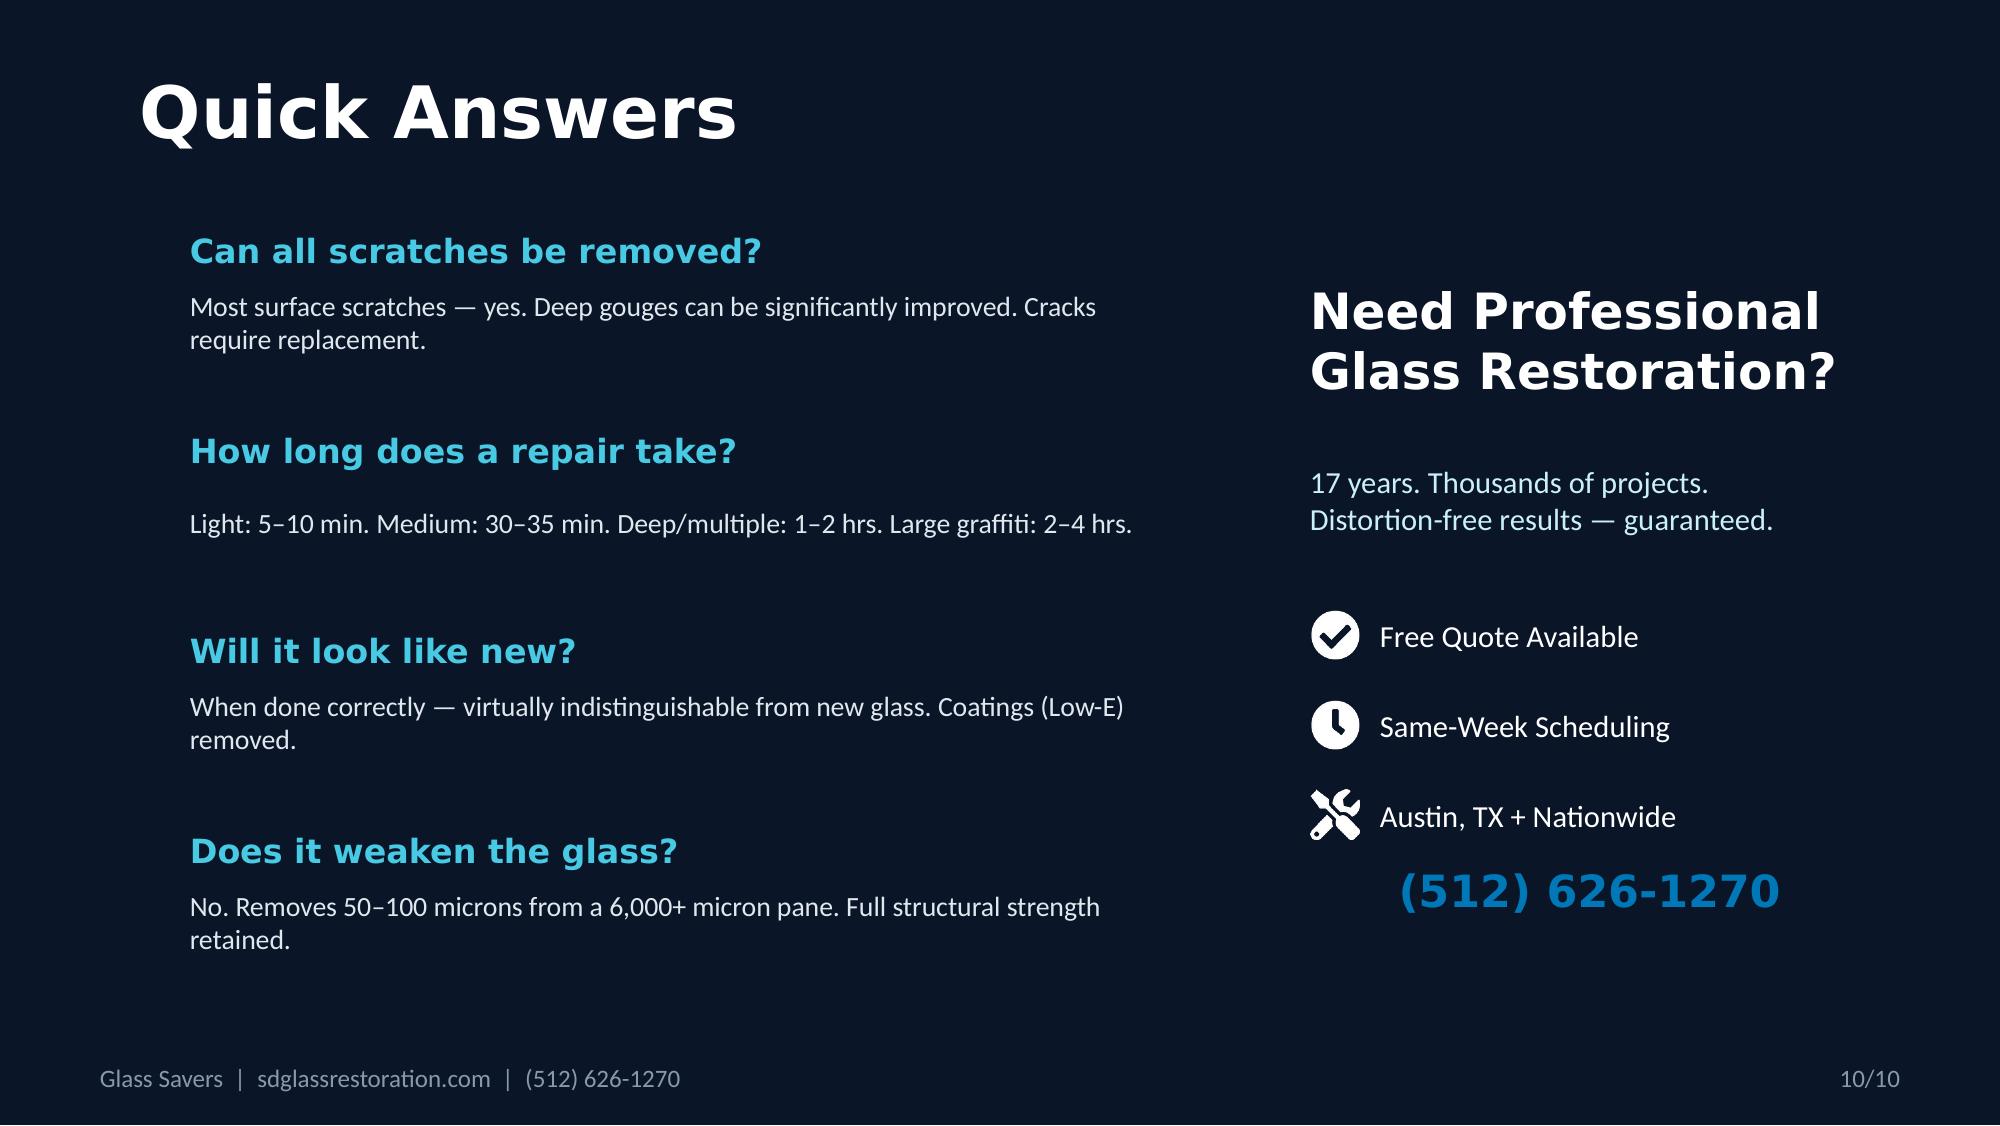
Can all scratches be removed, or are there limits?
Most surface scratches -- yes, completely. Light scratches that don't catch your fingernail polish out with cerium alone. Moderate and deep scratches require grinding but are repairable in the vast majority of cases. Extremely deep gouges can usually be significantly improved. The limiting factor is always distortion -- proper feathering is key.
The limit is when a scratch is extremely deep -- if the depth is more than roughly 20% of the glass thickness, removal would require grinding too much glass to be practical or safe. Also, scratches very close to edges on tempered glass are risky (the panel could shatter). If the scratch is actually a crack (has depth and length and branching), that's beyond polishing -- replacement territory. See our deep scratch removal case study for an example.
How long does a typical repair take?
It depends on scratch size and depth. Small, light scratch (2"): 5–10 minutes of polishing only. A deeper scratch maybe 6 inches long: about 5 minutes on coarse grind, 5 on medium/fine, and 10 on polishing -- around 20–35 minutes total. Deep or multiple scratches per window: 1–2 hours. Large graffiti-damaged windows: 2–4 hours.
A rule some use: about 30–60 minutes per scratch foot (per linear foot of scratch) for deep ones, including all steps. Experience speeds everything up. It's wise to under-promise and over-deliver. See how long does it take to polish glass? for real project timelines.
Will the glass look like new afterward?
When done correctly -- yes. Results are virtually indistinguishable from new glass. The scratch will be gone, no haziness or distortion. In fact, sometimes the repaired spot is clearer, because polishing might remove hazy buildup on older glass. That's why professional glass resurfacing is such a compelling service.
One caveat: if the glass had a Low-E or reflective coating, that coating will be removed in the repaired area. Also, if the glass had manufacturing distortions or waves originally (common in tempered glass), you can't fix those by scratch removal -- they're inherent. But your work won't add new ones.
Does scratch removal weaken the glass or remove protective coatings?
Not meaningfully for strength. A typical repair removes 50–100 microns -- negligible compared to a standard 6mm (6,000 micron) pane. Structural strength is retained. For tempered glass, heavy grinding could locally reduce surface compressive stress, but if you only remove a shallow scratch, the glass remains safe and intact -- companies do it on skyscrapers regularly.
As for coatings: yes, if the glass had a Low-E or reflective coating and you polish that side, you will remove the coating in that area. Those coatings are extremely thin (nanometers). Aftermarket tint films will also be destroyed -- peel them off before scratch removal, then reapply after.
How does resurfacing compare to replacement on cost?
Dramatically cheaper. Storefront scratch removal: $225–400, 1–2 hours. Same window replacement: $1,000–3,000+, days or weeks. The value proposition is huge: perhaps 60–80% cost savings. Learn more in our comparison of glass scratch repair vs. replacement. For commercial properties, resurfacing saves tens of thousands. Plus, it avoids disposal of old glass (environmental benefit) and construction risks.
Example: "Replacing this 8-foot lobby glass might cost $5,000 and a week of waiting; I can restore it for $800 in a day." That comparison is powerful. See this Encinitas project for a real-world example.
What about acid-etch graffiti or hard water stains?
Acid-etched graffiti (from vandals using glass-etching cream or acid) creates thousands of tiny scratches by roughening the surface. Repair is essentially the same -- sand and polish. Usually start at 220–320 grit and work up. The challenge is graffiti often covers a large area, so you have to refinish a bigger section evenly. See acid-etched graffiti removal.
Hard water stains are mineral deposits (calcium from sprinklers), not scratches. Light stains polish out with cerium alone. Heavy stains can actually etch the glass over time (milky dull surface). Polishing with cerium is a known remedy. You may not need coarse grit -- often just a felt pad and cerium or a slight abrasive pre-polish pad will clear them. See hard water stain removal services.
Can I use this process on auto glass?
Up to a point. Same materials work for light scratches like wiper marks -- polishing out hazy arcs from old wiper blades is commonly done. But windshields are laminated and even tiny distortion in the driver's line of sight is dangerous.
If you do attempt deeper windshield scratches: use lower grits very carefully, keep the area as large as possible, and expect to spend a lot of time blending. You might accept slight distortion if it's low in the windshield or not in primary view.
Side and rear glass (tempered) are more straightforward -- just watch the heat. Many glass resurfacing businesses avoid auto windshields for liability reasons and stick to architectural glass. See our windshield scratch repair case study for what's possible.
How messy is the process?
If done with proper precautions, it's well-contained:
- Dust: Dry grinding produces fine glass dust. Wet method turns dust into slurry which you wipe up, preventing it from floating around.
- Slurry splatter: Polishing will sling cerium oxide off the pad edges -- tiny white/orange dots on nearby surfaces. Mitigated by masking and using just enough slurry. Cerium wipes off with water from glass or metal.
- Water: Expect some drips with wet methods. Put down drop cloths.
- Noise: Grinding is noisy but short. No chemical fumes or major debris.
A professional tech will leave the site as clean as it was, minus the scratches. We even clean the glass thoroughly as part of the process.
How do I train new employees?
Start with this guide. Practice on scrap glass -- intentionally scratch it and remove using the full grit progression. Drill the rule: never advance to finer grit until the scratch is gone.
- Let them intentionally scratch a piece of glass and try removing it -- hands-on practice is key.
- Emphasize patience and not skipping steps. Many novices want to jump to polish too soon.
- Pair new techs with experienced ones for 3–5 real jobs.
- Create a laminated grit decision card as a field reference.
- Create a checklist they must follow until it becomes habit -- ensures safety steps aren't skipped either.
Most techs become proficient after 5–10 repairs, truly expert after dozens. Focus on feathering and temperature monitoring. See 5 red flags to watch for for what separates good companies from bad.
What quick references should I keep in the field?
Grit Chart (laminated): Extreme → 80 SiC. Deep (nail catches) → 180 Abralon. Medium → 360. Light → 500. Very fine → 1000 or cerium only.
Temperature: Never exceed 150°F (65°C). Back-of-hand test: if you can't hold it 3 seconds, stop.
Before/After Portfolio: Keep completed repairs on your phone. Our full case study gallery has 67+ examples.
Common Mistakes: Too fine → coarser grit. One spot → feather wider. Dried polish → keep slurry wet. Haze → polish longer or back to 1000.
Workflow Diagram: Assess → Clean → Grind (80) → Grind (120) → Grind (320) → Pre-polish → Polish (Cerium) → Inspect. Make a one-page printout with key reminders under each step.
When Glass Resurfacing Isn't the Right Call
We believe in this process, but it's not always the answer. If the glass has an actual crack through the pane, resurfacing won't fix it. If there's severe structural damage from impact, resurfacing handles the surface but not integrity. If a Low-E coating is critical and the scratch is highly visible, replacement preserves the coating. And if the glass is old single-pane and the client's already considering a double-pane upgrade, replacement may be the better investment.
We'll tell you if your situation falls into one of these categories. We'd rather turn down a job than deliver a result that doesn't hold up. Contact us for a straight answer.
Go Deeper: In-Depth Guides by Topic
Each guide below covers a specific area of glass restoration in detail, with real case studies, cost breakdowns, and local service information.
Glass Graffiti & Vandalism
Construction & Post-Construction Damage
Glass Scratch Types & Repair Methods
Commercial & Specialty Glass
Local Service Areas
Related Reading
Need Professional Glass Restoration?
17 years. Thousands of projects. Distortion-free results or we make it right.